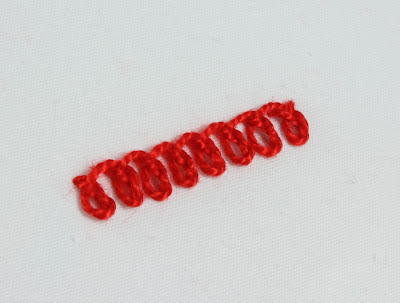
This is the rosette chain stitch:
It is the latest stitch on my 100 Stitches journey. I think this is a beautiful stitch that would be nice for borders:
I had avoided learning this stitch because it looked so hard! I had tried it a few times and I just wasn't getting it. But I decided to try again and I am so glad I did because now that I know how to do it, it is very simple and straightforward. For my little demonstration, I am using pearl cotton floss, dmc #666 and I am going to be drawing some parallel guidelines:
I drew mine about 1/4" apart:
This stitch is always worked from right to left. The first step is to come up through the fabric on the right edge of the top line:
Pull the floss all the way through and to the left:
now bring the needle around to the right in a big circle and go back into the fabric on the top line, to the left of where the floss first emerged. Bring the needle back out on the bottom line. Notice the needle is goin into the fabric at a diagonal, from the top line coming out on the bottom line at a slant:
The needle goes over the working floss at the bottom of the big circle:
Pull all the way through and this is the crossed loop that forms:
Now bring your needle up under the right side of the crossed loop. Don't go into the fabric or pick up any fabric, just slide the needle under the floss:
Pull all the way through, but not too tight:
Now, bring the needle around again, creating a big circle. This time, the needle goes under the working floss, into the fabric on the top line at a slant and emerging on the bottom line:
Start pulling through and make sure the needle now goes over the working floss at the bottom of the big circle:
Pull all the way through and you have this crossed loop again:
Slide the needle up and under the right side of the crossed loop, again not picking up any fabric, just sliding under:
And just keep repeating these steps
until you have a full line:
of beautiful stitching:
This stitch is nice and neat on the underside:
and gorgeous on the topside!
I'm really happy to add this stitch to my repertoire. I know I will use it as a border on tea towels. 100 Stitches suggested working this in a circle to form small flowers - I am definitely going to try that too!
This is stitch #48 on the 100 Stitches list, it is in the linked stitches category. I have finished all 13 stitches in the linked stitches category!
Tuesday, January 31, 2012
Friday, January 20, 2012
Snow days and a quilt update
We have had almost a week of snow!
We get snow most winters but not usually this much and it usually doesn't stay this long.
I love the gray sky:
and how beautiful the landscape looks
covered in white:
Rego and Berit LOVE the snow and everything about it!
Chasing snowballs, eating snow...
it's all good!
Speaking of snow, do you remember my snow quilt project?
I have made some progress with stitching motifs in the small plain fabric squares:
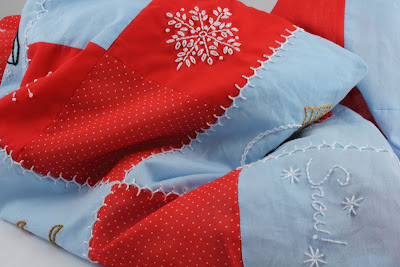
and I have decided to use the open cretan stitch for all the borders around the blocks:
I like this stitch, It is quick to do and suits the patchwork-y look of this quilt. So far so good - I will keep you updated on my progress.
Friday, January 13, 2012
100 stitches - knot stitch edging
This beautiful stitching is knot stitch edging. According to 100 Stitches, this is also know as Antwerp Stitch Edging. This is the first stitch I have done on my 100 Stitches journey that is done of the edge of fabric and I didn't use an embroidery hoop!
I did however, very much enjoy making a hem using my wonderful sewing machine! I am really pleased with the nice way it stitches:
To demonstrate my stitch, I am using this lovely pink floss, DMC color variations pearl cotton #4180:
For the first step of this stitch, the 100 Stitches instructions say to bring the thread in from the back of the fabric. I wanted to hide the knot so I started by slipping the needle into the hem:
and out through the bottom of the hem pulling all the way through. Now the the knot is hidden inside the hem:
The next step is to set up your needle and floss like you are doing a single blanket stitch. Just bring your needle down through the top or right side of the fabric out the back. Where you put your needle in determines how long vertically your stitch will be. I put mine right on my hem stitching line so that I could use that line as a guide line. Notice the postition of the needle and the working thread - the needle is going to pass over the working thread:
as you pull, it begins to form a blanket stitch:
pull all the way through:
Bring your needle around and pass it above the floss that is edging the bottom of the fabric but behind the loop you have just formed:
and start to pull it through - again notice the needle is going to pass over the working thread:
pull all the way through forming the "knot"
That is all there is to it! Now you just set up for the next stitch:
make the single blanket stitch:
and then the knot stitch:
100 Stitches suggests that you space these stitches about 1/4" apart:
It makes for an impressive line of stitching. I think this would look so pretty as an edging on a pillowcase:
This stitch is just as beautiful on the back too:
This stitch was very easy to learn and do. It was a relief after all the trouble I had with the eyelet hole stitch :) Thank you again everyone for all your help!
This is stitch #56 and is in the knotted stitches section of 100 Stitches.
Friday, January 6, 2012
snowman and snowflakes
Here is a snowman I've just finished stitching. I really like the look of this, especially with the snowflakes:
Do you like the color combination on his striped scarf? I do! This is not a color combination I would have thought to put together just looking through my embroidery floss collection. I had started with black floss for his top hat and I love the color combination of black and acid green so I put those together. Then I wanted some colors that went with the green. The acid green floss nicely matches the "yellow-green" color group on my color wheel. The complementary color group for the yellow greens is the "red-violet" group:
I had several beautiful floss colors that matched the colors in the red-violet group so I made this combination. I especially like the way it looks on the scarf fringe.
Here are the colors I used, with their floss numbers:
Subscribe to:
Comments (Atom)


