Showing posts with label Merry Christmas embroidery pattern packet. Show all posts
Thursday, December 13, 2018
Embroidered Christmas Presents - Part Two
I have finished embroidering the stack of Christmas presents {part one of this project can be seen here}
I used a variety of embroidery stitches and an interesting color palette!
The stitch list is as follows - the gold ribbon is outlined in Double Knot Stitch and filled in with Running Stitch. The top present is Satin Stitch outlined with Back Stitch. The middle present is outlined in Back Stitch, filled with Running Stitch, Straight Stitch and French Knots. For the bottom present, I outlined the box with Couching and filled it with Running Stitch. The box lid is outlined on the top edge with Chain Stitch, the side and bottom edge with Back Stitch. The lid is filled with Running Stitch and then overlaid with Jacobean Couching Stitch.
The floss color numbers are:
Saturday, November 10, 2018
Embroidered Christmas Presents
My current work-in-progress is the embroidering of this Christmas boxes motif.
I am trying a few different stitches on the biggest box and deciding which look best
I love the floss color palette I am using on this project. These are not colors I would usually think to put together. However, I was looking at my color wheel for ideas - I started with the gold floss. The triad color scheme for gold {yellow/orange} is red/violet and blue/green. Beautiful!
Posted by
Kim
at
11/10/2018
Labels:
color wheel,
Merry Christmas embroidery pattern packet
2
comments
Saturday, November 23, 2013
Getting Ready
Are you starting to get ready for all your Christmas and holiday season stitching? I am! I have quite a few sewing projects in the works.
I am looking over all my metallic floss and seeing if I need to add more colors:
I am planning some embroidery projects...
and starting to stitch some embroidery projects. I love this time of year.
Tuesday, December 13, 2011
Christmas tree!
I am stitching up a Christmas tree featuring some metallic floss ornaments:
I love the look of this metallic floss! The tree is stitched in regular six strand cotton floss, the bow and planter are stitched in satin floss:
These are non-traditional Christmas colors but I think they are really festive and pretty! Here are the dmc numbers of the floss I used.
Monday, October 25, 2010
Ideas on transferring patterns to fabric
There are so many ways to transfer a pattern onto fabric! I have been doing a little experimenting:
I selected three different fabrics. The dark blue fabric is a medium weight tight weave. The white is a light weight, medium weave fabric that you can easily see through. The pale blue is a medium weight, medium weave fabric:
I selected three different transfer methods. Wax free tracing paper, graphite transfer paper and
transfer pens. I chose two different transfer pens, both are water soluble:
The difference between the two pens is in their tip size. One has a regular tip and the other one has a fine tip:
You can really see the difference!
Now to start transferring! I have several images; a Christmas tree, two stockings and a present. I am going to start with the stockings:
I am going to transfer these onto the white fabric. Since you can easily see through this fabric, I am going to use the transfer pens to transfer. I will lay the image down - face up, and position the white fabric over the top. I usually put some tape on the edges of the image, also face up to keep it attached to the fabric:
Then I lay the white fabric over the top and start transferring. First the regular tip transfer pen:
See now easy it is to trace the lines?
And now for the fine tip - I love the fine tip - it makes for such an exact narrow line:
One thing to remember when using these pens is to not press too hard. Especially with the regular size tip - it seems to lay down too much ink and make a blurry transfer. The great thing about these water soluble pens is that if you make a mistake you can easily remove the lines with a damp cloth:
Gone!
Then you can stitch your image and remove the blue tracing lines when you are done. Make sure to remove them with just plain water and before you launder or iron the item! Otherwise, the pen marks may set and then you cannot remove them. Now for the Christmas tree. I am going to transfer this onto the light blue fabric, using the graphite transfer paper. I put the transfer paper on top of my fabric. Make sure the shiny side is against the fabric and the dull side is face up:
Then I put my image face up on top of the graphite transfer paper. I usually tape the three layers in place to keep everything from shifting around. Now you need something you can press along the lines to trace. I usually use a stylus:
I love this transfer method and see what a nice and crisp the image it transfers?
This has always been my favorite way to transfer - however, there are two drawbacks to this method. The first one is that the marks are permanent - you cannot wash them out. The second drawback I have only recently discovered. Since starting 100 Stitches, I have been wanting to incorporate the stitches I am learning into my projects. I noticed that some stitches do not cover my tracing lines. The chain stitch is the perfect example. Notice you can see the tracing lines inside the stitch :(
The next method is the wax free tracing paper. This comes in several colors for use on any dark colored fabric. My pack inludes white, yellow, orange, red and blue. I am going to use this yellow to transfer onto my dark blue fabric:
Place the colored side of the tracing paper against your fabric and place your image face up on top of the tracing paper. Tape into place and trace the lines with a stylus:
This method also leaves a nice crisp image that can easily be removed with a damp cloth.
I like all of these methods - they are easy to use and give good results. They all have different advantages/disadvantages. I think that the transfer pens take a little practice to get just the right touch for a crisp transfer. And as much as I have always favored the graphite paper, I think that if I am planning on using stitches such as the chain stitch in a project, I may opt for the transfer pens or removable tracing paper.
I selected three different fabrics. The dark blue fabric is a medium weight tight weave. The white is a light weight, medium weave fabric that you can easily see through. The pale blue is a medium weight, medium weave fabric:
I selected three different transfer methods. Wax free tracing paper, graphite transfer paper and
transfer pens. I chose two different transfer pens, both are water soluble:
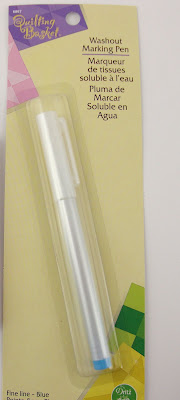
The difference between the two pens is in their tip size. One has a regular tip and the other one has a fine tip:
You can really see the difference!
Now to start transferring! I have several images; a Christmas tree, two stockings and a present. I am going to start with the stockings:
I am going to transfer these onto the white fabric. Since you can easily see through this fabric, I am going to use the transfer pens to transfer. I will lay the image down - face up, and position the white fabric over the top. I usually put some tape on the edges of the image, also face up to keep it attached to the fabric:
Then I lay the white fabric over the top and start transferring. First the regular tip transfer pen:
See now easy it is to trace the lines?
And now for the fine tip - I love the fine tip - it makes for such an exact narrow line:
One thing to remember when using these pens is to not press too hard. Especially with the regular size tip - it seems to lay down too much ink and make a blurry transfer. The great thing about these water soluble pens is that if you make a mistake you can easily remove the lines with a damp cloth:
Gone!
Then you can stitch your image and remove the blue tracing lines when you are done. Make sure to remove them with just plain water and before you launder or iron the item! Otherwise, the pen marks may set and then you cannot remove them. Now for the Christmas tree. I am going to transfer this onto the light blue fabric, using the graphite transfer paper. I put the transfer paper on top of my fabric. Make sure the shiny side is against the fabric and the dull side is face up:
Then I put my image face up on top of the graphite transfer paper. I usually tape the three layers in place to keep everything from shifting around. Now you need something you can press along the lines to trace. I usually use a stylus:
I love this transfer method and see what a nice and crisp the image it transfers?
This has always been my favorite way to transfer - however, there are two drawbacks to this method. The first one is that the marks are permanent - you cannot wash them out. The second drawback I have only recently discovered. Since starting 100 Stitches, I have been wanting to incorporate the stitches I am learning into my projects. I noticed that some stitches do not cover my tracing lines. The chain stitch is the perfect example. Notice you can see the tracing lines inside the stitch :(
The next method is the wax free tracing paper. This comes in several colors for use on any dark colored fabric. My pack inludes white, yellow, orange, red and blue. I am going to use this yellow to transfer onto my dark blue fabric:
Place the colored side of the tracing paper against your fabric and place your image face up on top of the tracing paper. Tape into place and trace the lines with a stylus:
This method also leaves a nice crisp image that can easily be removed with a damp cloth.
I like all of these methods - they are easy to use and give good results. They all have different advantages/disadvantages. I think that the transfer pens take a little practice to get just the right touch for a crisp transfer. And as much as I have always favored the graphite paper, I think that if I am planning on using stitches such as the chain stitch in a project, I may opt for the transfer pens or removable tracing paper.
Posted by
Kim
at
10/25/2010
Labels:
Merry Christmas embroidery pattern packet,
transferring patterns to fabric
17
comments
Wednesday, November 18, 2009
Merry Christmas printable place cards
I LOVE these new Christmas place cards! I have just finished a new packet of printable place cards - and listed them in my etsy shop. I had so much fun making these place cards.
After printing them and cutting them out, I decorated a few of them with glitter glue. To write the names on these cards, I am going to use decorative and my favorite - metallic pens!
Here is what the printable packet looks like:
Posted by
Kim
at
11/18/2009
Labels:
etsy,
Merry Christmas embroidery pattern packet,
place cards
0
comments
Thursday, October 22, 2009
New Project!

I have just added a new non-embroidery item to my Etsy shop. I think that so many of my embroidery patterns would look nice as images - full color, high quality images that could be used for all types of projects. Projects such as scrapbooking, journal embellishing, stationery elements, labels, tags etc. So the first set I put together is this Merry Christmas gift tag packet.

I used many of the embellishment patterns from my Merry Christmas embroidery pattern packet. I printed them out on a heavy cardstock paper, cut them out and embellished them with glitter glue. I also included a square template and a circle tempate that are appropriately sized to be decorative back or bottom layers for the tags. I printed these out on complementary colored paper and cut them out. I even used some scalloped-edged scissors on some of them. I am definetly going to use them as gift tags for my Christmas presents this year!
Tuesday, October 20, 2009
Merry Christmas! Embroidery Pattern Packet
My newest hand embroidery pattern packet is ready to go. It is titled Merry Christmas!

I love all the patterns in it and especially the beautiful ornaments of the main pattern. Here is what they look like stitched in gorgeous but always frustrating metallic floss:

I love all the patterns in it and especially the beautiful ornaments of the main pattern. Here is what they look like stitched in gorgeous but always frustrating metallic floss:

There are a ton of embellishment patterns included in this packet - here is a close up of the wreath pattern - I am busy stitching up more of the included patterns and I will post the pictures as I complete them!

Posted by
Kim
at
10/20/2009
Labels:
big B pattern,
etsy,
Merry Christmas embroidery pattern packet,
wip
0
comments
Subscribe to:
Posts (Atom)


