skip to main |
skip to sidebar
You may remember my post about starting my Christmas projects. I used all that beautiful fabric to make camera strap covers! I made one for each of my sisters.
The straps have a patterned side and a plain side so they are reversible. These were so easy and fun to make. Notice the extra puffy look to these?
I used this fusible fleece.
I cut a single piece of the fusible fleece just a little narrower and shorter than my fabric pieces
Then I ironed it to the patterned fabric before sewing the two pieces together.
So simple! It really gives the strap cover a nice heft and makes it soft and comfortable around your neck.
In all our Christmas celebrating, I didn't take pictures of the covers on their cameras, but I did take a picture of my prototype strap cover...I made this out of some scrap fabric :) not really my style but who can resist puppies and I have been enjoying wearing it on my camera!
I also wanted to say how happy I am to have received this for Christmas! An Omnigrid Quilter's Square! I can't wait to start using it.
I have been making some very sweet Christmas tags - all with the theme of gingerbread!
If you have recently visited my Etsy shop, you may have seen my new clipart listing. You can see that listing here. I designed a huge set of clipart images and four styles of paper that you can use to make all sorts of cards, embellishments and digital elements for your own blog or website. I used one of the elements here on my blog - you can see the gingerbread man on the left-hand side of my blog.
I have also really enjoyed using this and being able to layer the different elements and make some art.
All of these elements are in .png format, meaning they have a transparent background and can be layered one on top of the other to create a sort of 3-d look.
If you do not have a software program that handles .png files, I made up a different set of gingerbread themed items. These are all in .jpeg format. You can just print these as is. They are already set up with the layered look - I love the way they turned out. Since they are in .jpeg format they can be resized as well.
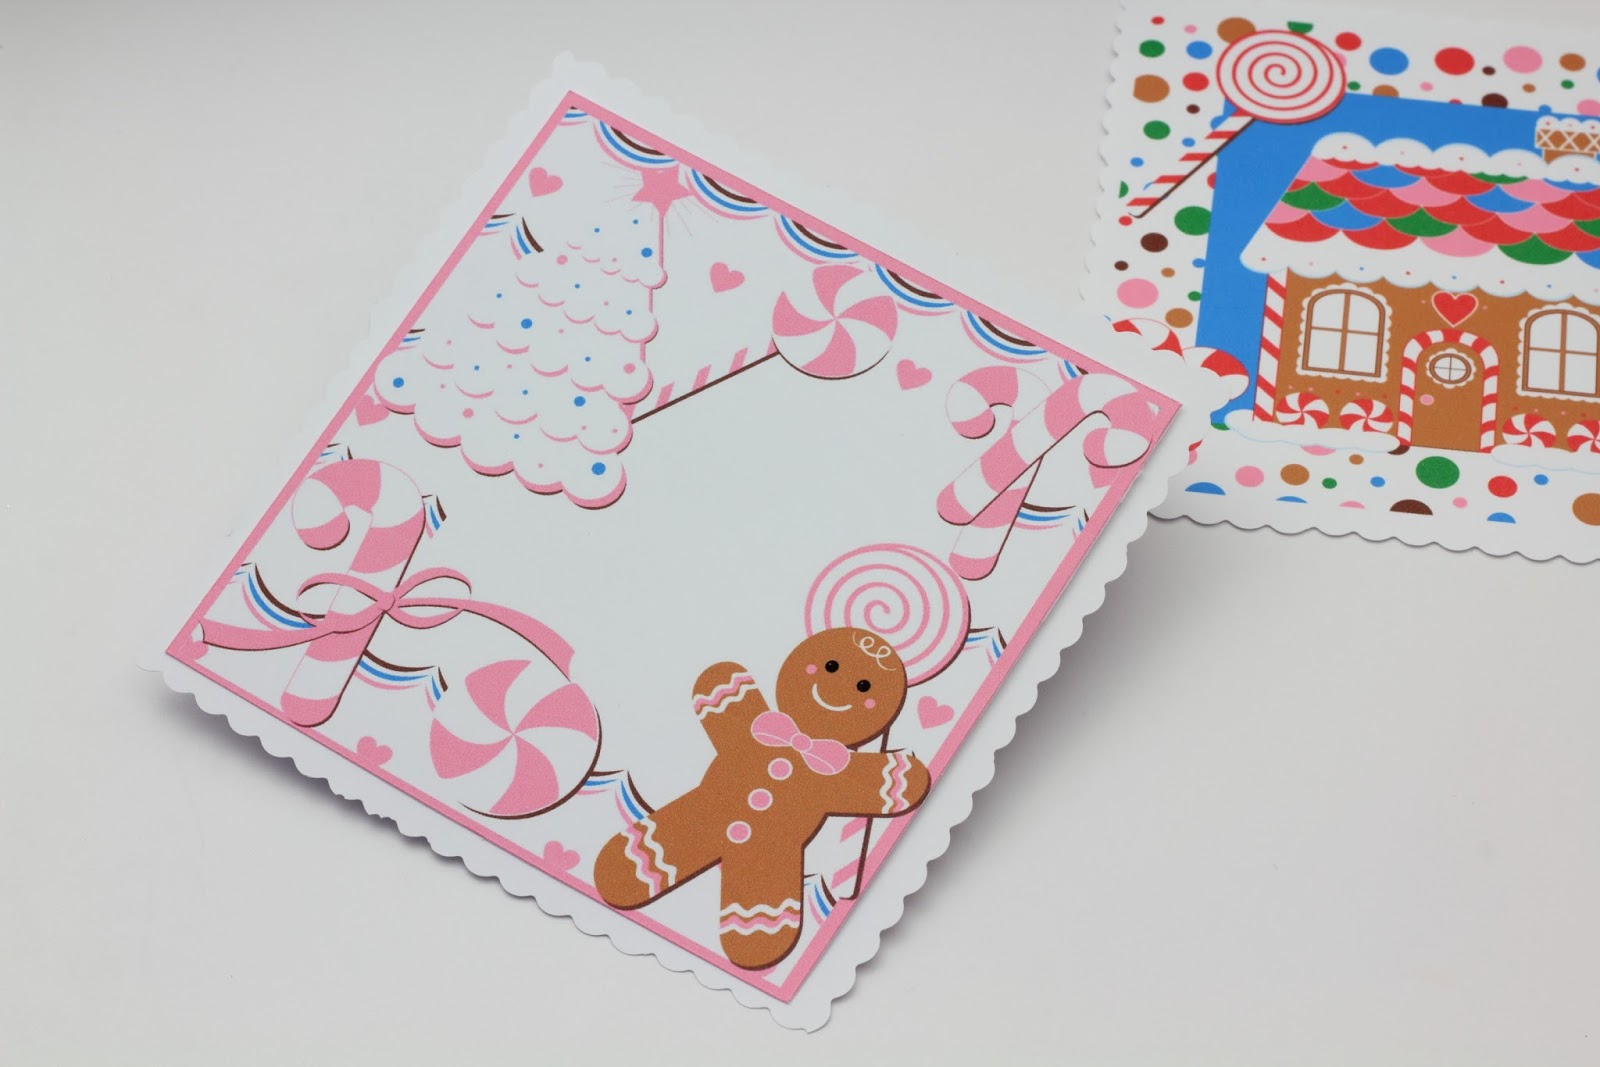
There is this little double sided gift tag. I scallop cut the edges on mine:
This yummy gingerbread house:
This gingerbread man on a rickrack border with candy
and this pink trimmed gingerbread man. I put mine on top of a piece of white paper and scallop cut the edges. I think he is my favorite:
These are all wonderful tags, I listed them today
and just in time for Christmas!
Time for another 100 Stitches post. Next on the list is the Honeycomb Filling Stitch. Sadly, I do not understand the instructions for this stitch! I haven't been able to find any other information or instructions - in fact an internet image search returns stitches that look nothing like this one! I followed the steps in 100 Stitches and this is what I came up with. I would love to hear from anyone that has experience with or ideas about this stitch.
Because this stitch is in the Drawn Fabric Embroidery category, I used my medium weave linen fabric. You really need to be able to count the spaces between the warp and weft threads on this one!
The stitch is worked from the top to the bottom. The first step is to come up through the fabric.
Now count over four threads to the right and insert the needle:
Pull all the way through. Count down four threads and bring the needle back up through the fabric:
Pull all the way through and go back into the fabric four threads up - this will be go into the same hole that your floss first went into going into the fabric:
Pull all the way through. Count back down the four threads and come back out of the fabric.
Now count four threads to the left and go into the fabric:
Pull through. Count four threads down and come up through the fabric:
Pull through. Count up four threads and go back into the fabric:
Pull through and count back down the four threads and come up out of the fabric:
Just continue these steps for the length of your stitching line.
Next, and this is where I do not understand the instructions, the next step says to turn your fabric and hoop around and start a new row working in the same way. I started working again from top to bottom. However, to make it look like the diagram in 100 Stitches, I started by coming out of the fabric four threads to the right:
Count four threads back to the left and go into the fabric:
Pull through and count down four threads and come back up through the fabric. These vertical lines will be sharing the same holes:
Just continue on like before and stitch the next row:
All the way to the end of the stitching line. Mine looks just like the 100 Stitches diagram here:
But now, I wouldn't know what to do next. There are no more diagrams or instructions. Any thoughts?
This is the underside of this stitch:
Up close, you can see how nicely the fabric is drawn, creating these open spots:
I think this is a beautiful stitch - but I don't think I have done it correctly!
This is #90 on the list of 100 Stitches.
Are you starting to get ready for all your Christmas and holiday season stitching? I am! I have quite a few sewing projects in the works.
I am looking over all my metallic floss and seeing if I need to add more colors:
I am planning some embroidery projects...
and starting to stitch some embroidery projects. I love this time of year.
I finished the olive border from my La Cucina wip. I love the result! As you may remember, I stitched this border onto fabric that I am going to use as a bread basket liner. The fabric is a nice large size, the finished dimensions are 19 1/2" x 15 1/2".
As you can see, it is much easier to photograph this when it is folded in half!
I hand stitched the hem. This is a 1" hem, with the raw edge folded under. I had considered top stitching the hem but decided to just press the hem and hand stitch it in place. I am so glad I did because you can hardly see my stitching and it just really gives a nice soft edge to the piece.
And I actually successfully stitched mitered corners!
I am happy to have this project completed and to have kept an accurate record of all the details! Or maybe not when I see the amount of time between my project start date and project end date?!
Here are the floss colors I used: