skip to main |
skip to sidebar
 I have learned a new stitch to add to my 100 Stitches Plus list. The Guilloche Stitch.
This stitch is described as a wide border stitch. It is a composite stitch made up of three different stitches ~ the Stem Stitch, the Straight Stitch and the French Knot. The Straight Stitches are then laced.
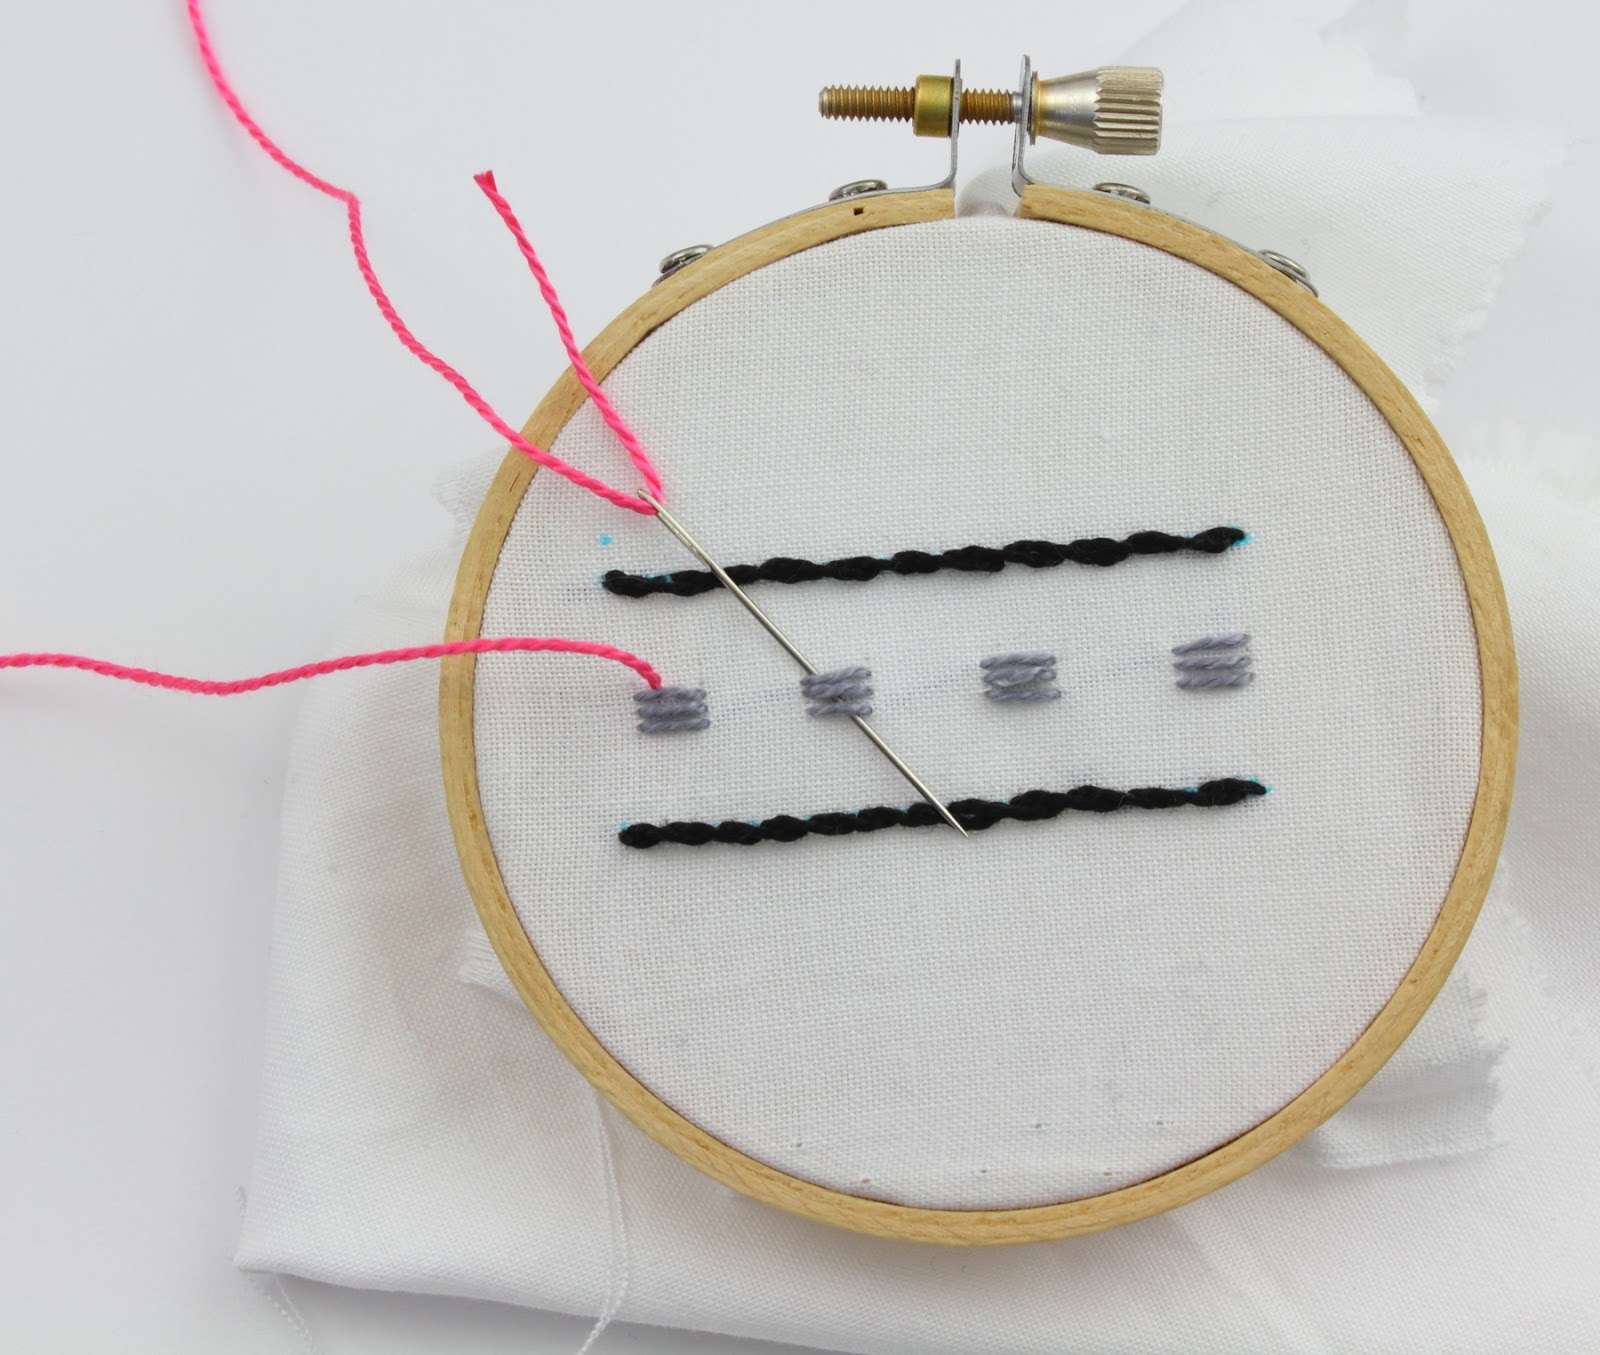
For my demonstration, I used three different colors of floss. Black, pink and gray. I also used my ruler and water soluble marker to draw some guidelines to follow:
My guidelines are 0.75" apart:
The first step is to stitch the two guidelines with Stem Stitch.
These two lines make up the outside borders. Now for the Straight Stitches. These are formed in equally spaced columns of three stitches each:
Now these Straight Stitches are laced. I used the pink floss for this step:
Lacing is really easy, just bring the needle up through the fabric:
pull all the way through and then slide the needle under the next set of Stem Stitches ~ notice the needle is not going back into the fabric but just sliding on top of the fabric and under the stitches:
When I got to the last set of Straight Stitches, I went back into the fabric. That is one half of the lacing. For the second half,
I turned my hoop upside down. Then I brought my needle up through the fabric:
and laced my way back to the beginning:
At the end, I went back into the fabric and then secured my floss on the underside.
Now for the French Knots. For these I used the gray floss:
One French Knot in each circle created by the lacing:
This is a look at the underside of this composite stitch ~ very tidy for all the detail going on above!
I really like this stitch and I especially love this color combination :)
The colors used are DMC 310 {black} DMC 318 {gray} and DMC 956 {pink}. These are all perle cotton floss.
The Guilloche Stitch is from the book Embroidery Stitches by Mary Webb.
I recently added a new embroidery pattern to my Etsy shop. The pattern is called Corgi and it is full of wonderful Corgi motifs.
One of the motifs I have stitched is this little portrait with a name banner and flowers:
I used a beautiful color variations perle cotton floss from DMC. This is number 4128.
I really love the name banner:
I used my water soluble marking pen to hand letter the name in the banner space. Next I stitched the letters using Back Stitch:
Here is a look at the Corgi Embroidery Pattern set:
I finished my gingerbread house! I first blogged about this project {here}. As I noted in that post, I stitched the entire project in perle cotton floss.
I ended up using nine different stitches on this project. They are:
The Satin Stitch for all the gumdrops, the stripes on the candy canes and the door knob.
The Double Knot Stitch for the roof outline.
French Knots on the roof and scalloped eave.
The Whipped Back Stitch for the round candies, the roof lines, and the door panels.
The Whipped Blanket Stitch for the door frame. Couching for the inside of the two fudge sickles and over the Cross Stitches at the base of the house.
Back Stitch for the house pillars, the sucker sticks, and the base line.
Straight Stitch for the diagonal lines on the sucker sticks.
The gingerbread house motif is from the embroidery pattern set Gingerbread.
I used a vibrant color palette consisting of five different colors.
Here are the color numbers:
Time for a new stitch on my 100 Stitches Plus list. This is the Whipped Back Stitch.
This stitch is composed of a line of Back Stitches that is then whipped with a contrasting or same colored floss. For my stitch, I am using a contrasting color floss.
I stitched the line of Back Stitch in dark brown perle cotton floss.
For the whipping, I used this beautiful blue perle cotton floss:
Whipping a line of stitching is very easy. To begin, I brought the needle up through the fabric above the first Back Stitch:
I pulled the floss all the way through. Next, I brought the needle around and slid the needle under the next Back Stitch. Notice the needle is not going into or picking up any fabric, it is just sliding atop the fabric and under the stitching line:
I pulled until all the floss had passed under the stitch.
Then I brought the needle around to slide under the next Back Stitch. The whipping is always done in the same direction:
all along the line of stitching. When I reached the final Back Stitch, I went back into the fabric right above the final stitch:
I pulled the needle all the way through and secured the floss on the underside of the fabric:
So simple and such a beautiful stitch!
I found this stitch in the book Embroidery Stitches by Mary Webb.
If you follow me on Instagram, you may have seen a picture of my current stitching project...a gingerbread house!
I am stitching the entire piece in perle cotton floss.
I love the bright candy colors. When I finish this piece, I will make sure to post the floss numbers for my color palette.