skip to main |
skip to sidebar
I have a finished stitching to share.
Do you remember when I posted about combining some motifs from my Here Comes Santa Claus pattern set?
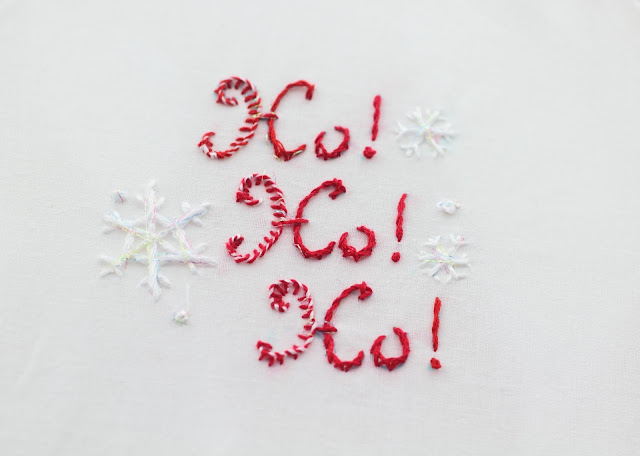
I put these motifs together and finished up the stitching. I am so happy with the result!
The red lettering and the white snowflakes are the perfect combination for Christmas. I added some sparkly rainbow blending filament to the snowflakes.
I used a Whipped Blanket Stitch for the left arm of each H. The Blanket Stitch in red and the whipping in white. It reminds me of a candy cane. I also added some of the rainbow blending filament to the right arm of each H:
I also completed a beautiful border. This is all done in metallic floss!
Well, except for the red berries. They are Satin Stitched in regular cotton floss. I added a few Straight Stitches using gold blending filament to add some sparkle.
The holly leaves are outlined with Stem Stitching and filled with Straight Stitches.
The light and dark green lines with the gold French Knots are couched. What an easy way to deal with metallic floss!
I have a stitch from my 100 Stitches Plus list *
to share. This is the Whipped Blanket Stitch.
I have admired this as a decorative stitch,and wanted to learn how to do it. I found the instructions in the book Embroidery Stitches by Mary Webb.
The first step is to make a line of blanket stitch. I used perle cotton floss - this is dmc color variations #3840. Then I selected a nice contrasting color for the whipping - this blue is dmc #798.
The first step is to come up through the fabric on the right edge - just below the horizontal line of blanket stitching:
Pull the floss all the way through:
Then bring the needle around and slide it under the horizontal line of the blanket stitch - in between the two vertical lines of the stitch. Don't pierce the fabric, just slide on top of it.
Pull the floss all the way and this will create the first wrap or whip around the horizontal line:
Here is a better look at the whip:
Now, just like before, bring the needle around and slide it down between the next two vertical lines of stitching and under the horizontal line:
Pull the floss through:
and just continue doing those same steps all along the line of blanket stitching.
To finish mine, I just went back into the fabric when I reached the end of the vertical stitching lines:
Then I secured my floss on the underside:
This is an easy stitch to do and I am really looking forward to using this as a decorative edging.
I like the contrasting colors! I also think it would look good with tone on tone or with a metallic floss for the whipping.
This stitch is in the Looped Stitches category.
* 100 Stitches Plus
You may have noticed in my last post, the "100 Stitches Plus" title with a list of categorized stitches. I will be adding to this list as I continue to learn new stitches - you can read about how this all started and my plans to continue here .
If you want to see any of the 100 Stitches Plus posts, you can click on the 100 Stitches Plus icon on the left side of this blog or follow the label link.


