
Well - I tried :( Unlike so many of the stitches that I have learned from 100 Stitches, this eyelet hole stitch looked sooooo easy but turned out to be almost impossible for me to do! These three are the best I could do:

Here is a darker picture so that you can see the white satin on white fabric. Don't look too carefully!

Here is the hall of shame with a few of my many attempts. What am I doing wrong?! At first I thought that these looked so horrible because the outer edge was so jaggedy and uneven looking.

So, I decided to use this hole template as a guide:

I drew a 1/4" inside hole and a 3/8" outside hole. After practicing with different types of floss, I decided to go with three strands of cotton floss:
The first step is to stitch a running stitch all around the outer circle:

The next step is to pierce the center of the small hole. 100 Stitches suggest either using a "stiletto" to pierce the fabric - or to cut across the center both ways. I used my scissors to cut two small x's:

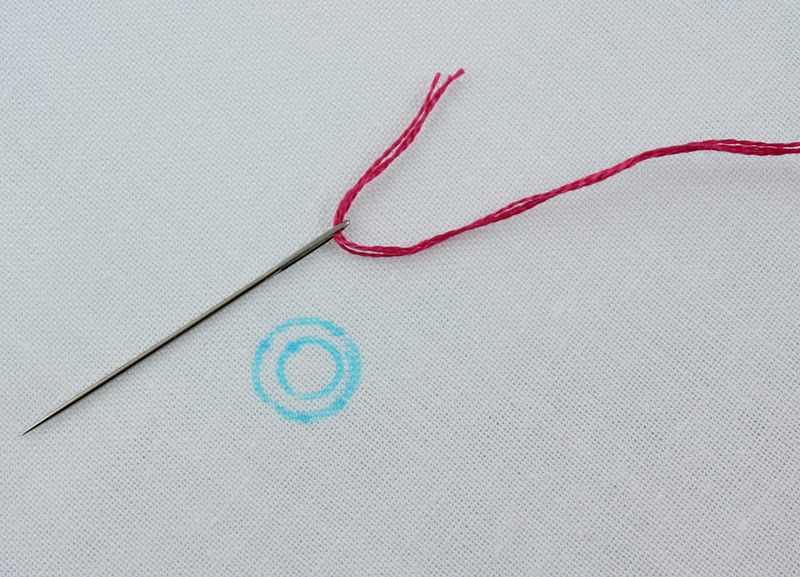
I think at this point, I had the best results with using only one strand of my cotton floss:

Come up through the fabric right at the outer edge of your running stitch:

Now bring your needle down into the open area of the hole and back out through the fabric on the outside edge of the running stitch. Notice the needle is emerging right next to where the floss first came through. This is just a simple overcast stitch:

Pull all the way through:

and take the next overcast stitch by going back into the hole and out on the outside edge of the running stitch:

Just keep overcast stitching and it will start to draw the raw edges of the fabric to the underside of the fabric and enclose them in the stitching.

Just keep working your way around.

Until you are done. Now secure the floss on the underside.

Here is a closer look at the uneven outer edge! I seem to be having trouble with two things...keeping a consistent outer edge of my stitching and stitching so that there is even "coverage" all around the circle. I would very much appreciate any suggestions or tips or ideas for improvement!

Here is the underside of my stitching:

I think I like these best in a white on white. It seems more traditional, like eyelet lace fabric. I also really liked using the satin floss on these. I think it looks prettier.

This stitch is in the flat stitches section of 100 Stitches and is #21.
UPDATE - please read this post for updated instructions and corrections on this stitch!


10 comments:
Huh, I'll have to give this one a try. I agree that the white on white looks very elegant and pretty! What if you came up consistently on your blue line, making sure your needle was outside your running stitch? I can't think of anything you could do differently. Keep us posted! :)
I think you did great for your first try. I actually have another set of instructions in one of my "Sew Beautiful" Magazines Let me see if I can pull them all out and see if I can find it. I only have 20, so it shouldn't take long. It had a pretty decent article on how these are done along with some other stuff. I'll be in touch.
Ditto previous comment :-). Maybe using a smaller (thiner) size needle? I too will check on my various stitch glossaries and let you know what I find, but I really thing you did great!
How about if you try doing a split stitch around the outside circle so it is a solid line of stitching. Maybe cut a round hole in the middle so there is more uniformity in the stitches? Just guessing because I have never tried this. But great pictures showing us your process!
Found the instructions. When I get to the office next week, I'll scan it in and email it to you. In the meantime, it they used one strand of floss and a #10 sharps needle. It looks like they came up on the very outside edge or the running stitch then back down just on the other outside edge. It's a very, very small stitch and really close to the running stitch. For the smaller eyelets, they used an awl to make the hole and with the larger eyelets, they made an "X" in the center and folded the corners to the wrong side then did the overcast stitch. Then they clipped any corners on the wrong side.
HTH
Angela
No suggestions, because I've never been brave enough to try a stitch that involved! Yours really don't look bad, and with practice I'm sure they'll get to where you want them.
Thank you everyone for all your help and advice! I really appreciate it!
Thank you Denise! Looking back at these pictures, I see that maybe I could try doing the line of running stitches just inside the outer circle and then bring my needle up right on the circle line. Might be easier for me to keep even!
Monika - Thank you! I am SO happy you are back! I think I will experiment with a smaller needle
Hi Ruth B - Thanks! I wondered about a solid line of stitching too - I have seen pictures of stitches similar to this one and it seems like they have a line of stitching on the outside that stays visible. I am not sure what that stitch is...
Angela - Thank you! I appreciate all your help. I think you are right - I am thinking that I should have used two circles more similar in size and cut a much bigger vertical/horizontal cross in the smaller circle. The instructions in 100 Stitches did say to do it that way for larger circles or a long eyelet hole. I am off to experiment!
Hi Michelle, :) Thank you! I intend to keep practicing! I know I wouldn't want to stitch these on something permanent until I can make them look much better!
The instructions that I have only have one line of running stitch and one circle. And the overcast stitch is very small because it comes up on one side (very close) of the running stitch and down on the other (also very close.) You'll be able to see when I send the instructions. It also has a pic of a dress that has the eyelet so you can see what they look like completed.
check this post from avo Meri, I think that would be a big help!!
http://avomeri.wordpress.com/2012/01/14/ilhos-eyelets/
Hi Papgena! Thank you for the link - it is a wonderful post and very helpful!
Post a Comment