Tuesday, December 3, 2024

Floss Color Swatch Book

 Here is some new floss to add to my floss color swatch book

 I ordered 62 skeins of floss from DMC:

60 of which are not in my swatch book and many are new to me colors.  I made my swatch book with number lists from 1 to 5000.  To add the new color swatches to my book, I punch a hole next to the corresponding number:


 Then I take a swatch from the floss skein and loop it through the punch hole:

Then I wind the skein around a floss bobbin 

and add it according to color to my collection!

 Currently, DMC has over 600 thread colors, and they are adding new colors all the time.   I like to keep my swatch book up to date and I also like to make a nice, big swatch so that it is easy to match threads!

Tuesday, November 12, 2024

Pueblo Stitch


This beautiful stitch is the Pueblo Stitch.  This is the latest stitch I have learned on my 100 Stitches project. 

I found this stitch in the book Embroidery Stitches by Mary Webb.  My version looks a bit different because she used a two-ply twisted wool thread that is split while stitching but I am using two separate perle cotton threads in contrasting colors: 


This is a decorative line stitch, I worked this from left to right, however Embroidery Stitches shows the line worked from right to left.   

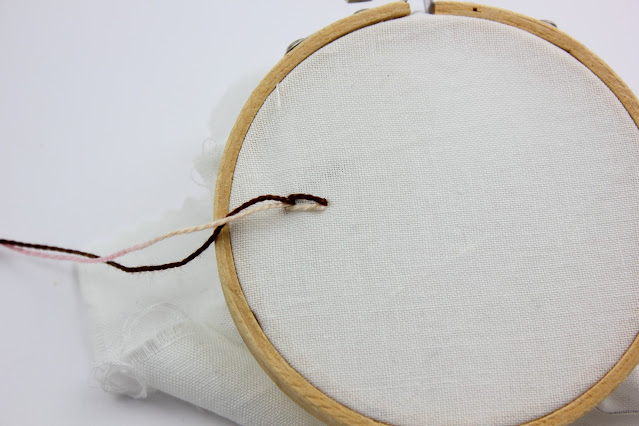
The first step is to come up through the fabric:


Go back into the fabric a little to the right of where the needle first emerged.  Since I am using two threads, I needed to make sure to have them spread apart on either side of the needle so that they will "split" the stitch and give the correct twisted appearance: 

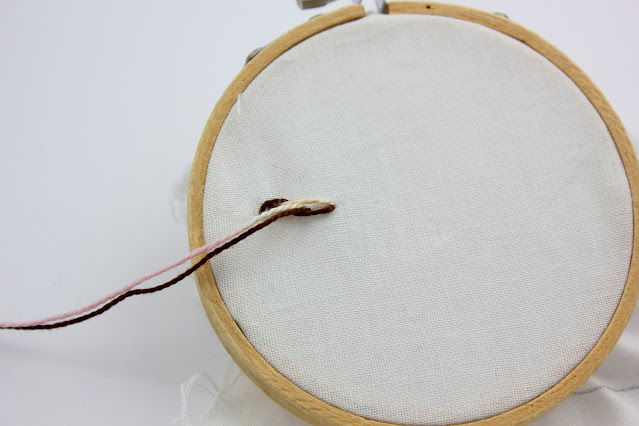
Come back out of the fabric right next to the spot where the needle first emerged:


pull all the way through:


Now bring the needle around for the next stitch.  Go into the fabric a little to the right from the first stitch:


Set up your threads - to add the twist, change the thread positions.  The thread that was on top now is on the bottom.  In my case, the first stitch had the brown thread on the top and the creamy pink on the bottom.  for the next stitch I made the creamy pink on top and the brown on the bottom: 


Pull all the way through to form the second stitch:


Bring the needle around and arrange the threads to start the third stitch:


I continued like this until the end of the stitching line and ended by going back into the fabric right at the final stitch:


I secured my thread underneath by weaving it between a couple of stitches:


Here is the completed line of stitching:


Friday, October 4, 2024

Color Palette Inspiration

I have some palette inspiration to share.  This little image is from a vintage bookplate.  I think the colors will make up an interesting palette for an embroidery project.  I matched all the colors with DMC brand floss I had on hand but


I did not have any floss that matched the banana:


I think DMC 370 may be a good match so I will be ordering that color and adding it to my collection.

My color palette inspiration journal is really filling up!


Saturday, August 31, 2024

Works-in-Progress


I have three works-in-progress to share.  These motifs are from the Thanksgiving and the Sly Fox pattern sets: 

All three have been transferred to fabric and I am stitching them in beautiful autumnal shades

I will post stitch and floss color palette information soon! 

Thursday, August 22, 2024

Damask Darning

This is the latest stitch I have learned on my 100 Stitches list.  This is Damask Darning.  It is a filling stitch made up of columns of short slanted stitches: 

The slanted stitches need to be evenly spaced and each  the same size. To ensure that I do that, I am using an even-weave fabric:


The first step is to bring the needle up through the fabric:


form the first slanted stitch by going back into the fabric, making a note of how many spaces to the right and how many rows down:

and pulling the thread all the way through.  Form the next slanted stitch directly under the first one:


Continue these steps and then start on the next column of slanted stitches:


The stitches will be the same length in each row:

Start the third column the same way:

Continue filling in with slanted stitch columns.

This is a beautiful stitch and would be perfect to fill large areas in an embroidery project.  

I found this stitch in the book Embroidery Stitches by Mary Webb.

Thursday, August 15, 2024

Color Palette Inspiration


I keep a color palette inspiration journal.  I like to match embroidery floss to the inspiration colors. 
My newest addition is this vintage postcard


inspiring this floss palette:


I will take a sample of each floss color and add it to the edge of my journal page.  I make sure to note on the back of the page the floss brand and color number.  


Saturday, June 8, 2024

Sulky Stick 'n Stitch for Hand Embroidery

I am using Stick 'n Stitch from Sulky to transfer an embroidery motif to fabric.  This motif is from my Flower Fancy pattern set:

 The Stick 'n Stitch sheet is dissolvable fiber with a peel off paper-backing.  I put a sheet of  Stick 'n Stitch into my ink-jet printer paper tray and printed the image.  This prints beautifully.  The stitching lines are really distinct and easy to see:


Then I cut around the image:  


Next, I peeled the paper backing off the printed sheet and stuck the motif onto my fabric:

I chose a lovely color palette

and started stitching!  When I was done with the stitching, I rinsed all of the dissolvable fiber off of my project.  I used cold water and it took a few minutes of rinsing.  There was no residue left.  The only downside I noticed was that a few of my Back Stitches {you can see at the top of the green curling stem} were not tight against the fabric.  I must not have pulled them through tightly enough and only noticed after the dissolvable fiber was gone.  I will remember that the next time I stitch with this product.  


I really like this method of transferring a motif to fabric and I am looking forward to using it again!