

I have another100 Stitches post! This beauty is the Wave Stitch Filling. This is a drawn fabric embroidery stitch. Notice the open effect this has on the fabric where the stitches meet:

I am not sure that I did this stitch correctly but my final result certainly looks like the diagram from 100 Stitches so I think it will work. I found the instructions so confusing! I will explain why a little further on in this post. I am using perle cotton floss, this is DMC #4180 Color Variations

This stitch is worked from right to left so my first step is to come up through the fabric on the right hand side of my stitching area:

Count four threads above where the needle emerged and two threads to the right and go back into the fabric:

Pull the thread all the way through:

Count four threads to the left and come back out of the fabric:

Pull the floss through and then go back into the fabric in the same hole where the needle very first emerged. Make sure to pull the floss firmly, this draws the hole bigger to start giving the open effect:

Pull the floss through and then count over to the left four threads and come back up through the fabric.

Pull the floss through. Count four threads up and two threads to the right and you should be going back into the fabric in the same hole as the end of the last stitch:

Just continue in this fashion to the end of the stitching area.

Now this is where I found the directions confusing. At this point, you are supposed to turn the fabric around to start the second row. At first, I thought you were supposed to come out of the fabric just like you started the first line of stitching. But if you did this, you are coming back out the hole you just went into and obviously, the stitch just falls out. So don't do this:

What I think you are supposed to do is to come back out of the fabric four threads up and two threads to the right of where you just went into the fabric:

pull the floss all the way through and then go into the hole:

Then just stitch the row like you did the first row of stitches going through the same holes to make the open effect.

At the end of that row, turn the fabric around again and this time, have your needle emerge four rows down and two rows to the left to start the next row of stitching. Does this seem right? I figured that as long as I was making these diamond shapes and pulling my floss through the same holes to keep making the open effect, I was doing it correctly.
I stitched along the third row:

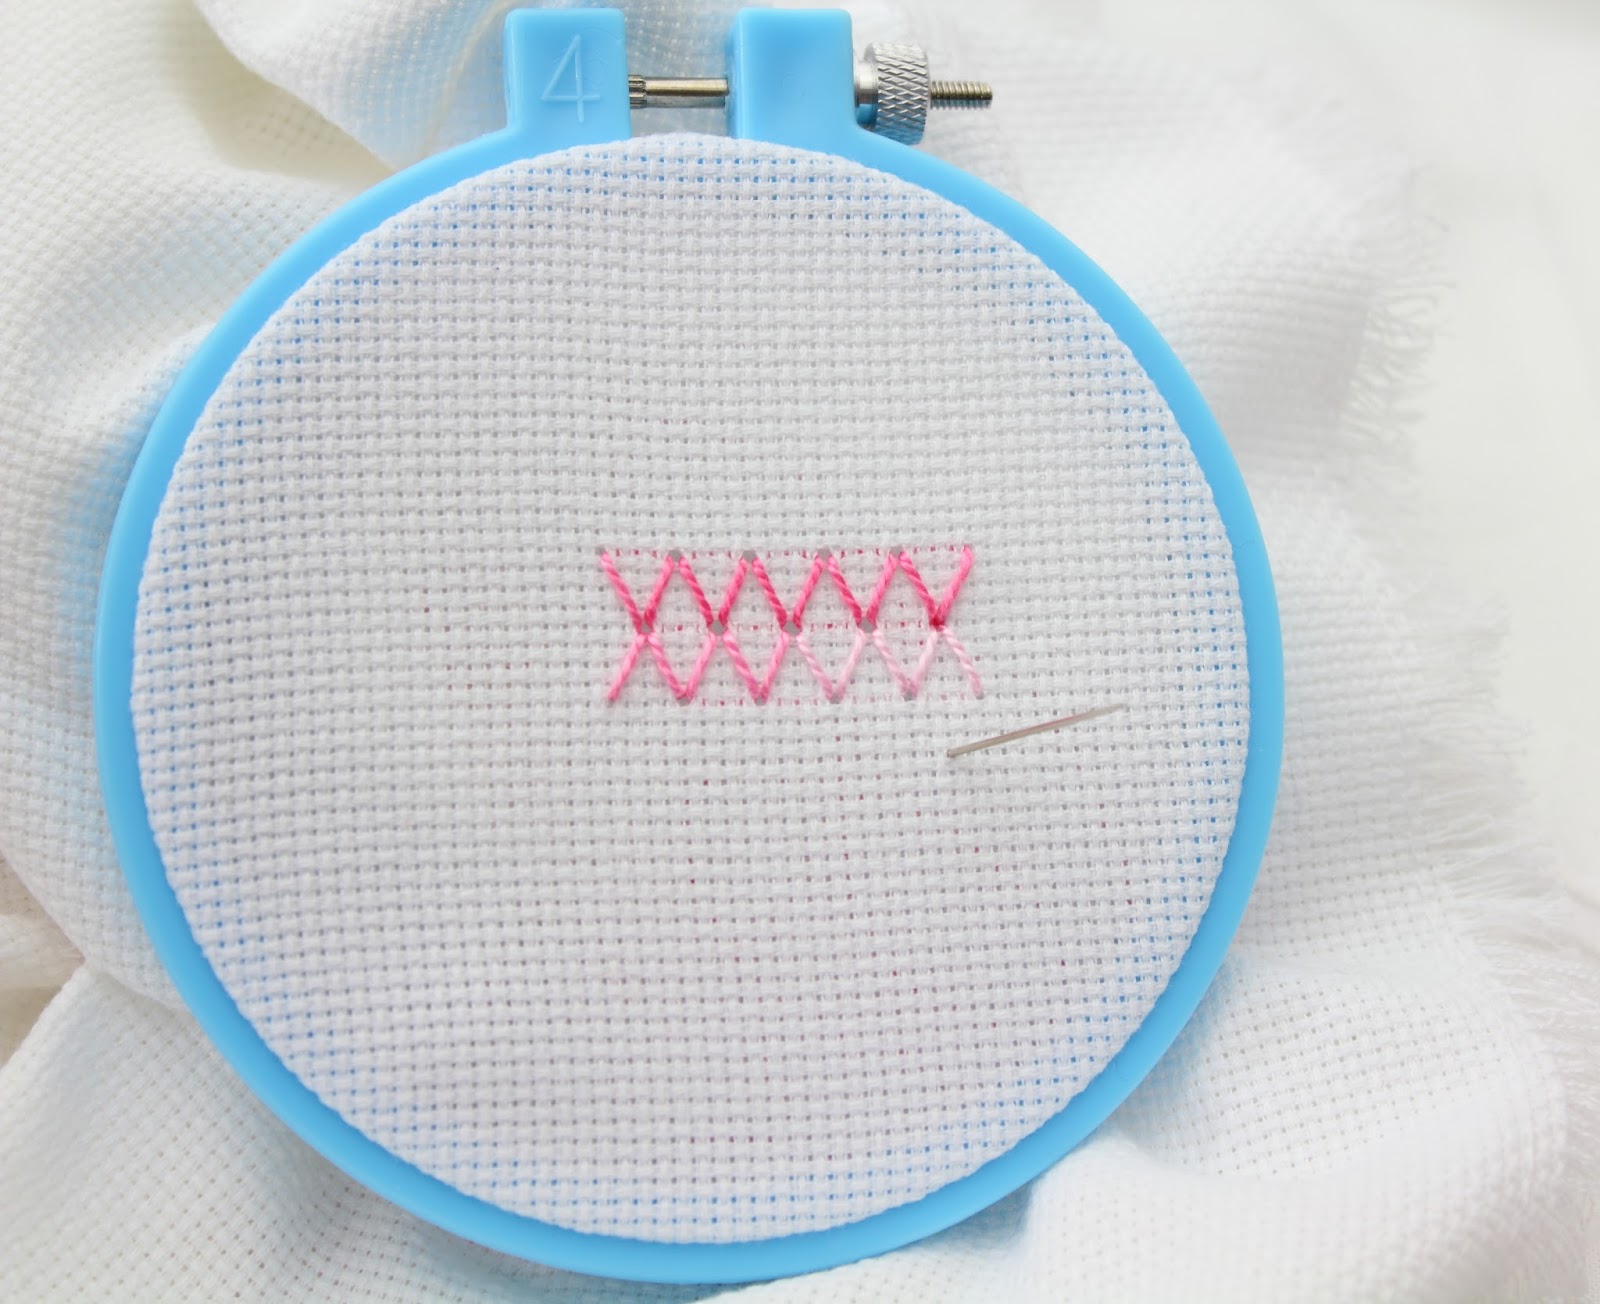
and when I was done, it looked just like the diagram in 100 Stitches:

Here is a closer view.

And a shot of the underside. See the huge knot I made on the left hand, second row of stitching? I made the knot that big because on my first attempt at this stitch, my knot actually pulled through the fabric when I was trying to draw my floss firmly enough to achieve the open effect!

This certainly is a beautiful stitch. I would appreciate any comments or advice if you know anything about doing this stitch!
This is #91 on the 100 Stitches list. It is from the Drawn Fabric Embroidery Section of 100 Stitches.


Kim, I love this stitch!! I am making a baby bonnet for a friend, and I can see this stitch on the bonnet close to the brim. I'm going to try it! Thanks so much for sharing, and it is so timely!!
ReplyDeleteFicou muito bom!Muito bom!
ReplyDeleteNunca fiz este ponto, tenho dificuldade com os "pontos contados".
Um abraço!
Egléa
It was very good! Very good!
Never made this point, I have difficulty with the "points scored".
Hugs!
Egléa
Now, you know I am in awe of any stitch which requires counting! This is just lovely Kim, and very effective in that shade.
ReplyDeleteKim, honey,
ReplyDeleteThanks for the walkthrough.
You are very generous in explaining.
Very educational, congratulations,
Honey, have a great day,
kisses,
Lígia e =ˆˆ=
Thanks Angela - That sounds like such a great use for this stitch! I hope you blog about the bonnet.
ReplyDeleteHi Eglea - Thanks! You should try this one too!
Thank you Jules - lol :) I love using the color variations floss on these complex stitches.
Ligia - Thank you :) Have a great day too!
Thanks for this tutorial! It looks perfect :)
ReplyDeleteSilvia - You are welcome! Thanks :)
ReplyDelete