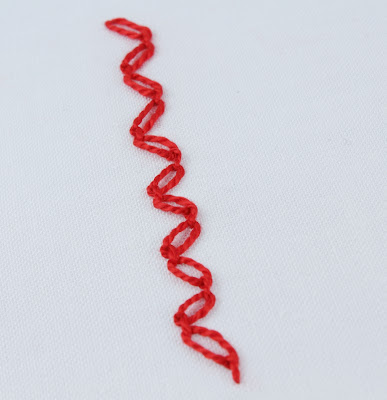
Isn't it a beautiful stitch? It is the next stitch on my 100 Stitches list.
It looks a little like ric rac - a perfect trimming stitch!
I found that when learning and practicing this stitch, drawing two parallel guidelines really helps.
Nothing however could help make it easier for me to figure out this stitch! After an amazing amout of time spent staring at the 100 Stitches drawing, I think I have it down. Here is how I do the stitch. First step is to come up through the fabric on one end of one of the guidelines. As you can see in the picture, I am starting at the right end of the top guideline:
Pull all the way through and bring the needle and working floss around like this:
Position the needle over the working thread where it first emerged:
The basic steps for this stitch are to wrap the working thread around the needle. Sort of like a french knot but you are only wrapping the working floss around once:
Draw the working floss snugly around the needle, not too tight - and draw it almost to the tip of the needle:
Then a little to the left of where the floss first emerged, go back into the fabric:
and come back out on the opposite guideline. Notice that my needle is coming out on a diagonal to the guidelines:
Now adjust the working floss so that the needle is going to go over the working floss:
Pull all the way through:
and a nice loop forms:
Now the next stitch starts on the bottom guideline. The steps are the same. The needle is over the working floss where it emerged:
then the working floss is wapped around the needle:
Drawn snug and almost to the tip of the needle, the needle goes into the fabric:
emerges on the opposite guideline:
working floss is positioned under the needle:
start pulling the needle through:
and pull forming a loop:
and the second stitch is complete.
Here is a picture of the underside of the stitching:
The zig-zag cable chain stitch is #46 on the 100 Stitches list and is in the Linked Stitches section.


8 comments:
WOW...i always get excited when i see you have posted a stitch tutorial AND this one is a treat! thank you so much for your step by step photos AND underside. kim, you're a blessing indeed! :)
What a great stitch! I always look forward to your posts! Thanks for a great tutorial!
fabulous stitch and thank you for the detailed tutorial
Thank you donna!ee - I was really glad you asked about showing the underside of the stitching - I think it is a really nice addition to the 100 Stitches posts!
Mary - Thank you!
Anna - Thank you - this is a sort of complicated stitch but it is beautiful!
I adore your blog. You bring back fond memories of hours spent embroidering with my aunt. I wish I was a kid again to relive those moments. Thank you so much for sharing all of your tips. Maybe I'll pick up a needle again one day soon. ;) happy stitching!
Hi Sandy D - Thank you! I hope you do start stitching again :)
PRECIOSOS LOS BORDADOS Y LA FORMA DE PODER APRENDER.
UN SALUDO.
Alicia - Hola - Gracias!
Post a Comment