Friday, October 28, 2011

Victorian Christmas stitching

I wanted to share some stitching I recently finished.  These patterns are all from my Victorian Christmas embroidery pattern packet.


I love this Victorian era inspired lantern and:


lettering:


It looks so beautiful! I stitched this on a huge piece of cotton, not knowing exactly what I was going to do with it when finished.  I also have these patterns - Joy,  Peace,  and (not shown) Noel.  I think these would be perfect for a table runner/napkin combo!


Here are the colors I used for this stitching:


Tuesday, October 25, 2011

Gingerbread wip - almost finished!

I have been working on this elaborate little gingerbread house embroidery project:
 

You might remember in my first wip post for this project, I was detailing all the different stitches I was using.


I am now finished with all the stitching!


The only new stitch I added is the split stitch that I used for the candies that make up the roof tiles:


I don't really know what I am going to do with this.  I stitched it on a nice piece of quilters weight cotton.  The fabric piece measures 15" x 16" so I have a lot to work with.
 

I also have these beautiful trims:


and five more gingerbread house patterns.  I would like to make a sort of series project.  I have stitched three so far, this one that I just finished, the gingerbread townhouse and the little woodland cottage . I could make...maybe a series of stitched pictures for the holidays? Perhaps a series of pillows or maybe a gingerbread themed quilt top?  I would love to hear any suggestions!


Here are the floss colors I used:


Tuesday, October 11, 2011

Progress report...


Remember this wip? Well, I have made a bit of progress on it!


The last time I posted about this, I had started the candy canes and finished the swirly candy.  For the swirly candy I used the whipped running stitch - I love the effect it gives! 


For the second candy, I decided to use the couching stitch.  It is a fun stitch to do and I love the look of it:


Here is the couching stitch completed:


and now a close up of the completed candy canes in the long and short stitch:


Almost done!  I am just finishing this third candy which I am doing in back stitch:


I will post a picture of the finished project I make out of this soon. I have some ideas involving trim...


Saturday, October 8, 2011

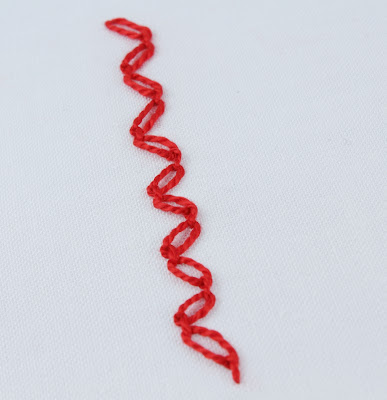
100 Stitches - Zig-Zag Cable Chain Stitch

This is the zig-zag cable chain stitch:


Isn't it a beautiful stitch?  It is the next stitch on my 100 Stitches list.


It looks a little like ric rac - a perfect trimming stitch!


I found that when learning and practicing this stitch, drawing two parallel guidelines really helps.


Nothing however could help make it easier for me to figure out this stitch!  After an amazing amout of time spent staring at the 100 Stitches drawing, I think I have it down.  Here is how I do the stitch.  First step is to come up through the fabric on one end of one of the guidelines.  As you can see in the picture, I am starting at the right end of the top guideline:


Pull all the way through and bring the needle and working floss around like this:


Position the needle over the working thread where it first emerged:


The basic steps for this stitch are to wrap the working thread around the needle.  Sort of like a french knot but you are only wrapping the working floss around once:


Draw the working floss snugly around the needle, not too tight - and draw it almost to the tip of the needle:


Then a little to the left of where the floss first emerged, go back into the fabric:


and come back out on the opposite guideline.  Notice that my needle is coming out on a diagonal to the guidelines:


Now adjust the working floss so that the needle is going to go over the working floss:


Pull all the way through:


and a nice loop forms:


Now the next stitch starts on the bottom guideline.   The steps are the same.  The needle is over the working floss where it emerged:


then the working floss is wapped around the needle:


Drawn snug and almost to the tip of the needle, the needle goes into the fabric:


emerges on the opposite guideline:


working floss is positioned under the needle:


start pulling the needle through:


and pull forming a loop:


and the second stitch is complete.

Just make the next stitch start on the top guideline exactly like the first stitch.  Keep stitching and end up with this:


Here is a picture of the underside of the stitching:


The zig-zag cable chain stitch is #46 on the 100 Stitches list and is in the Linked Stitches section.

Wednesday, October 5, 2011

Victorian Christmas Embroidery Pattern!

I have a new embroidery pattern packet in my Etsy shop!  This one is full of gorgeous patterns for Christmas stitching projects.  All the patterns are in a Victorian era theme.  Here I am stitching some Victorian style lettering along with a lantern:

This is what the pattern packet looks like:
I will be sure to post my progress on this stitching!