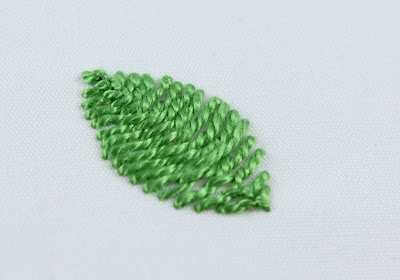
100 Stitches time again :) Next up is the Cretan Stitch:
This beauty looks like a great one to use for leaves:
As soon as I saw it, I knew I wanted to use it for one of the leaves from the Roses embroidery pattern. I think it will be perfect!
I used my water soluble pen and traced a single medium sized leaf. For the floss for my demonstration, I chose this beautiful and very leaf-y colored pearl cotton floss. This is dmc #988.
The first step is to come up through the fabric at the center top of the shape:
The next step is to make a small stitch on the right side of the shape.
*** I am pretty sure that I have figured out how to do this stitch correctly, however I think I need a bit more experimentation and practice before I feel confident that I am doing it correctly. The reason I say this is because I am still not sure how straight or slanted my needle should be in these next steps ***
The needle goes in at the edge of the shape and emerges inside the shape. Here you can see my needle is fairly horizontal.
As the needle comes all the way through, it is going to pass over the working thread. Pull all the way to the left:
Now the needle is going to go into the fabric on the left edge of the shape and emerge inside the shape and again, the needle is going to pass over the working thread:
And pull all the way to the right:
Next, the needle goes back in on the right side of the shape, emerges inside the shape and passes over the working thread:
Back and forth until the shape is filled.
*** Notice how my neede is a little more slanted here? As the shape widens and narrows, it is hard to make the individual stitches close enough together without changing the slant of your needle, this is where I need to do a little more experimenting and practicing***
When you are done, you will have a filled shape:
Here it is all cleaned up with the blue marker lines rinsed out. I like the interesting texture this stitch gives:
I think the stitches on the left side of my shape are a little more evenly spaced:
This stitch is even more interesting from the underside. It makes an outline!
I love the idea of using this stitch for leaves. Especially rose leaves:
This is stitch #35 and is listed in the Looped Stitches section of 100 Stitches.
Thursday, April 12, 2012
Subscribe to:
Post Comments (Atom)


6 comments:
ooh it looks lovely and such neat stitching and clear photos, thanks! I really must try some new stitches.
oh how cool is that. I would call it leaf stitch! Definitely a leaf filler.
Hi Wenda - Thank you! This is a fun one to try :)
Mandy - Thank you! It is a perfect leaf stitch - I can't wait to use it on a real project.
This is really pretty :)
There are so many creative stitches out there!
I agree, it is perfect for these leaves! It looks fun to stitch too :-).
Thank you Johanna
Monika - Thank you!
Post a Comment