Next up on the
100 Stitches endeavour is the flat stitch. Here it is making up this Dr. Seuss-like flower:

You may recognize this flower image from the
strawberries embroidery pattern packet. This is the flower increased in size by 250%. Sure makes it easy to see for this demonstration :)

Rather than my regular floss, I am using dmc #4180 variegated pink perle cotton floss! I think this floss will look neater and be easier to see in my close-up stitch pictures. I am stitching this on a light weight 100% cotton fabric and using a #24 chenille needle. Notice this blue pencil?

This is to mark some stitching lines. 100 Stitches suggests that you draw two lines down the center of the shape you are filling to act as stitching guide lines and to designate the size of the stitch. Hmmm...let's hope I will be able to see these lines well enough!

The first step is to come up through your fabric on one edge of the shape:

Now go down through the fabric at the farthest stitching guide line and come back up through the fabric at the edge of your shape:

100 Stitches stresses that this is all about stitching alternately on each side of the shape you are filling. The needle is always coming
up through the fabric on the
outside line of the shape. So now you pull the thread through and put your needle back down on the far stitching guide line and back up on the outside line of the shape:

And then back again:

Just keep alternating side to side. The stitches should be close together and overlap each other:

Just keep going until the shape is filled!

Repeat for each petal, add some back stitch around the center and put in some french knots and you have:

This stitch is very easy and really fun to do! It is stitch #10 and is in the Flat Stitches section of 100 Stitches.

 That is the back stitch you see outlining the teapot body. I also used the backstitch for the flowers and the lettering.
 Now the question is, what am I going to make with this? I had originally planned on a tea towel. I would just hem it and add some trim. This would make a really cute towel - I stitched this on a really big piece of fabric so I could make something bigger. I was thinking I might want to use these little pieces:
 There is a creamer, sugar bowl, and two matching tea cups. I think these would look perfect on the other end of a towel or perhaps I could make a small table cloth? I will post a picture of whatever I come up with! Now onto some nice summer garden pictures! Remember my pea project?
 My pea plants are all in full bloom, taller than their supports and are producing yummy sugar-snap peas!
 I also have started some nasturtiums:
 And this is a non-edible sweet pea. This is the first flower of this plant to bloom. I have these planted in front of a trellis so that I can support them as they grow tall and hopefully produce tons of flowers! Sweet Peas smell so good and they make really nice cut flowers.
 We had a cold, wet and rainy June, so my roses have not been doing very well - however this reliable yellow bloomer always has beautiful blooms:
 I also wanted to post pictures of my two garden helpers. They always keep me company and are interested in everything that is going on. This is Berit
 and this is Rego


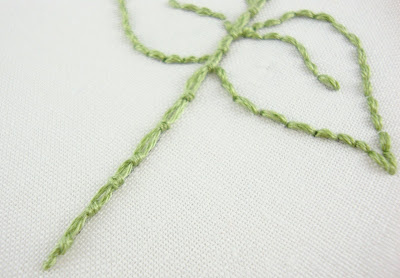
 This stitch is the latest stitch I have learned on the
 Pull the floss through to make a stitch and then position your floss perpendicular to your stitch and stitching line:


 This is important because now your are going to slide the needle under BOTH the first and second stitch in the side by side overlapping area:
 Again, go under the stitches, not catching the fabric, just wrapping the floss around the stitches - and again do the wrapping twice:


 This little green and white one is the one I use everyday. I keep all my #24 chenille needles in it. I love it - especially the front cover with this blue flower and button!
  This needlebook is one that she just made - she used one of the cupcakes from my
  This is what the books look like inside. They have felt pages for needles.
 I love these new needles. The size 28 is so delicate (and sharp!) I took a picture to show the size difference in the needles:
 The size 24 is at the bottom of the picture, above that is the 26 and at the top is the size 28. You can see how much finer and shorter the 28 is than the 24! I am thrilled with these needles and my new needle book and can't wait to start using them!
 This was a really fun and very quick project. I made a small pillow pattern that fit one of the images in the
 I love the way it turned out. To fill the pillow, I used loose polyester fill. It really made for a nice puffy pillow!
 You may recognize this flower image from the

 The first step is to come up through your fabric on one edge of the shape:
 Now go down through the fabric at the farthest stitching guide line and come back up through the fabric at the edge of your shape:
  100 Stitches stresses that this is all about stitching alternately on each side of the shape you are filling. The needle is always coming up through the fabric on the outside line of the shape. So now you pull the thread through and put your needle back down on the far stitching guide line and back up on the outside line of the shape:
 And then back again:
 Just keep alternating side to side. The stitches should be close together and overlap each other:
 Just keep going until the shape is filled!
 Repeat for each petal, add some back stitch around the center and put in some french knots and you have:
 I started out with this simple embroidery of a strawberry. This is from the
  I am planning on making the back of the pillow a quilted panel! And by quilted, I mean small squares sewn together in a patchwork pattern :)
 I will post my progress pictures on this as I go along, but in the meantime, I also wanted to share some beautiful flower pictures. We are having a really wet spring - very typical for the pacific northwest! Everything is so green and pretty. This is a chive flower in my herb garden:
 and white - which is almost in bloom:
 I am developing a new flower bed outside my shop/garden shed and I started these foxglove plants from seed! I also have several foxglove plants in this bed that are native to this area. The native plants always have a pinky-lavender flower. I wanted some other colors too so I bought a multicolored seed packet and now I have white to pale pink and a beautiful yellow. I love these plants and so do the bees!


