Time for another installment of my journey through 100 Stitches! This is the Spanish knotted feather stitch. A beautiful stitch isn't it?
This is a stitch I have wanted to feature and tried to do several times before. However, I just couldn't "get" how to do it. I was so confused by the explanation and accompanying pictures in 100 Stitches. I tried again yesterday and finally in frustration, I did a net search and came up with this extremely helpful how to on YouTube. It was done by Mary Corbet of Needle 'n Thread. She has a such a wonderful website and blog with beautiful pictures too! Anyway, just watching her video once answered all my questions and I was able to do the stitch.
Here, after a little practice, is how I did my stitch. For my demonstration, I am using this gorgeous pearl cotton floss. It is dmc color variations #4210 radiant ruby. I am also debuting the latest addition to my embroidery hoop collection, this little 4" hoop:
I am doing this stitch from top to bottom - that is how 100 Stitches demonstrates the stitch. A helpful tip from the Mary Corbet video is to draw three parallel guidelines - it makes all the difference to doing this stitch! I drew mine spaced 1/8" apart:
The first step is to come up on the right hand guide line. Come up a little below the starting end of the line:
Pull your floss all the way through. Now go back into the fabric at the top end of the middle guide line. Slant your needle to the left:
Come back out of the fabric on the left guideline:
Notice the needle tip is emerging under the working thread:
Now bring the working thread over the needle tip - the working thread is going to go over then under the needle:
So it looks like this:
Start pulling the needle through and this loop will start forming:
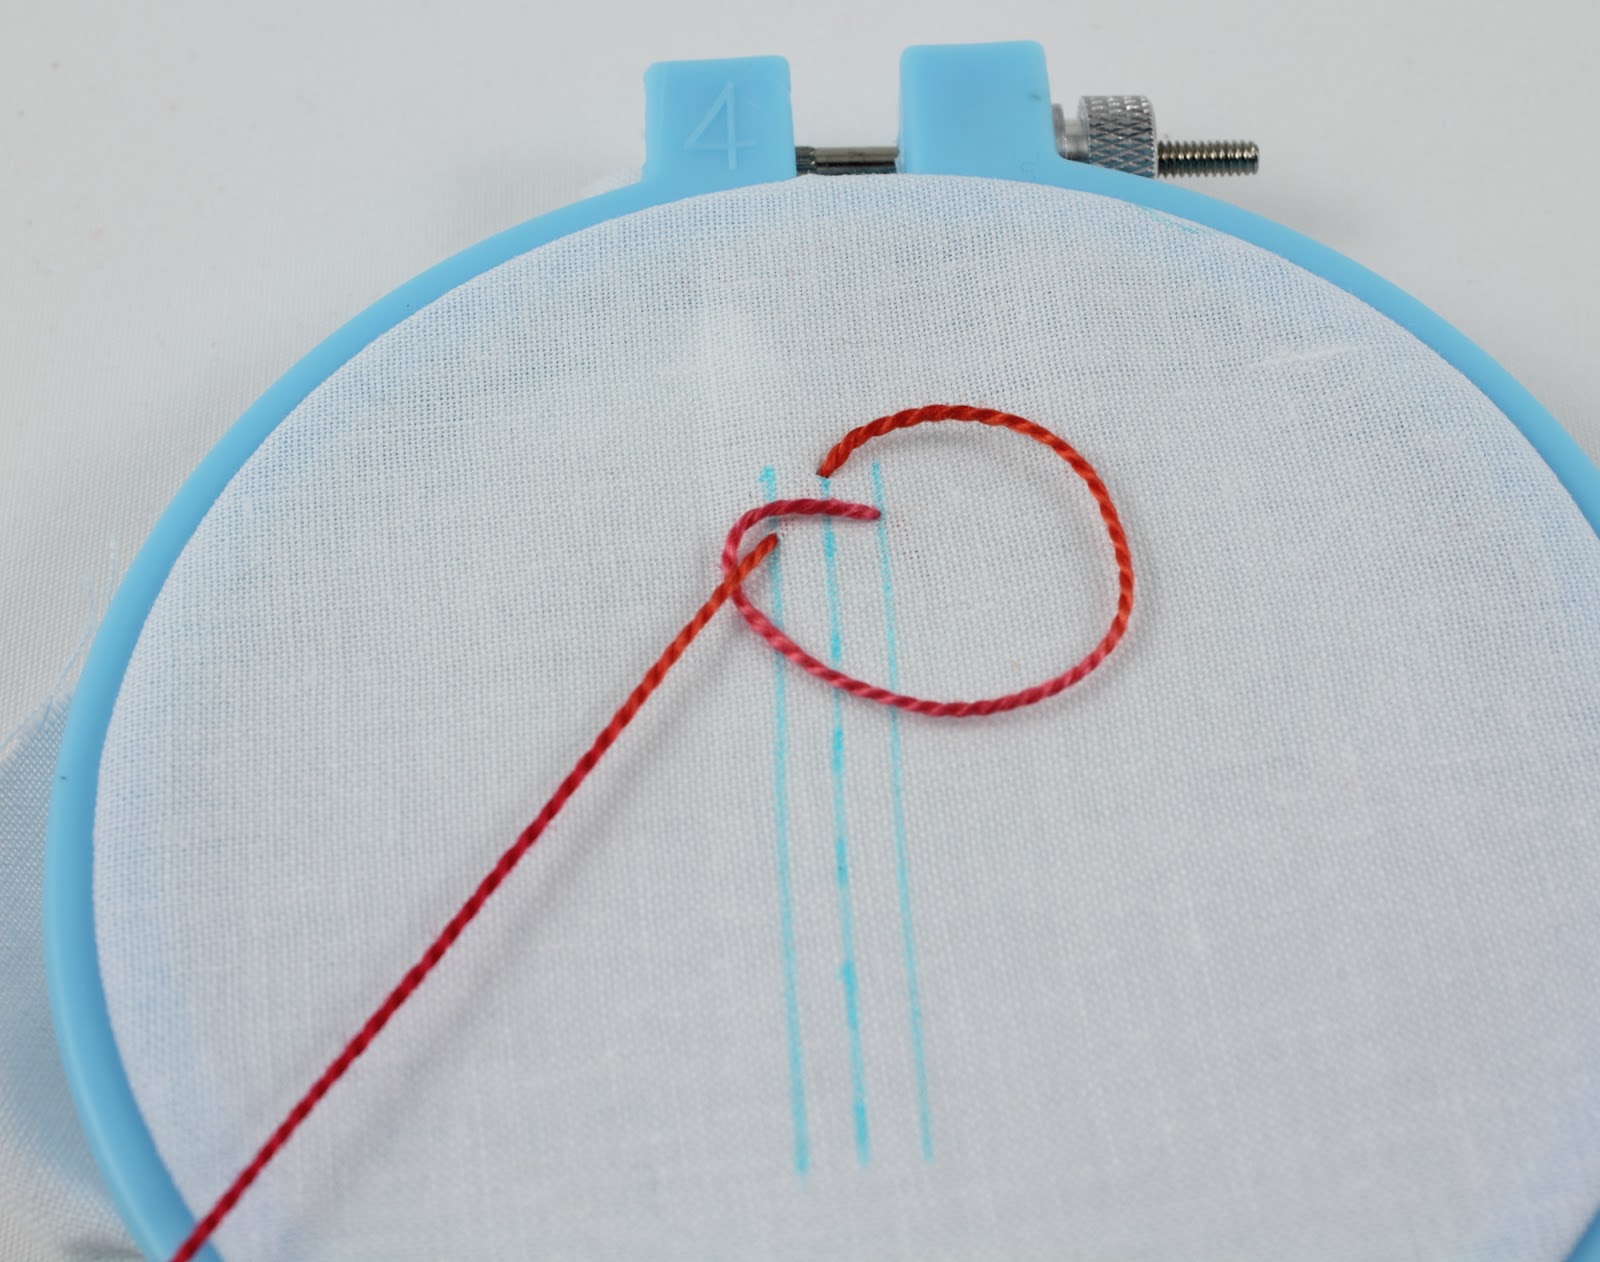
Pull all the way and you will have this slanted stitch.
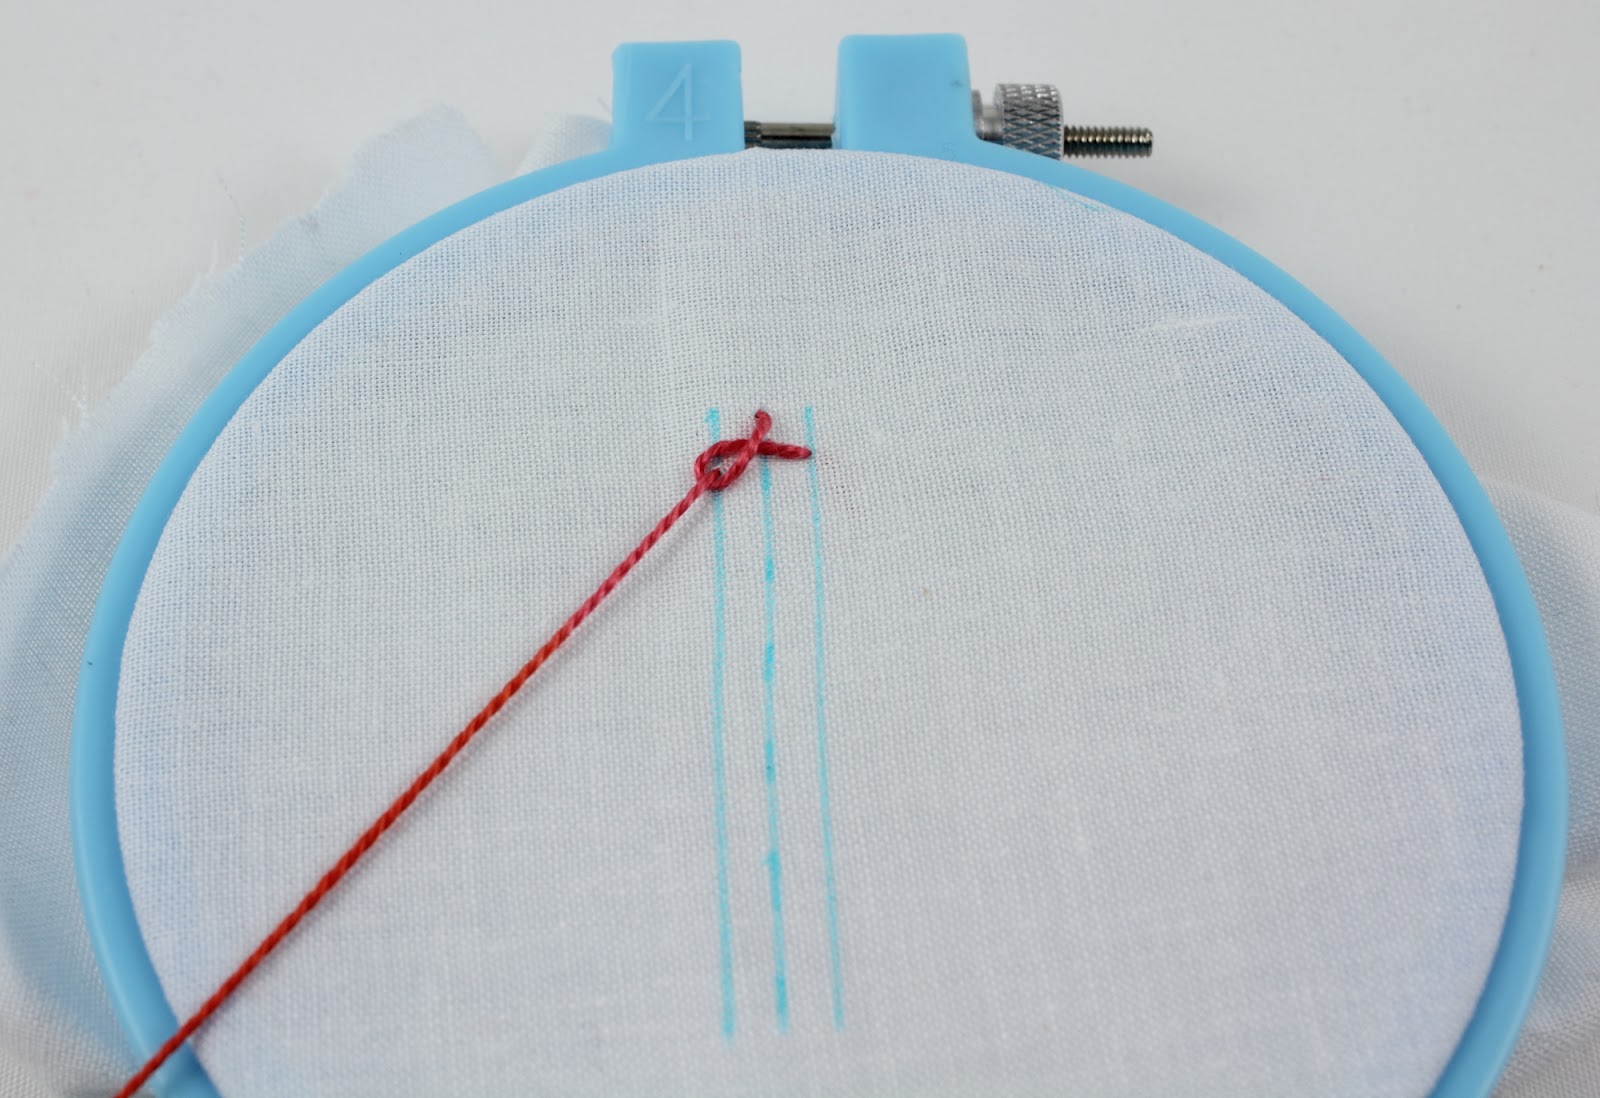
Now the needle goes back into the fabric on the middle guideline. It is going to go into the fabric between the two threads making up the slanted stitch. It will go in on the middle guide line slanting to the right. The needle will emerge on the right guide line:
Once again, bring the working thread over the needle:
and then under the needle:
and pull the needle through, forming a loop
Pull all the way through and a right slanting stitch is formed:
Now the needle goes back into the fabric on the middle guide line. Notice it is going between the two threads of the right slanting stitch.
Slant this stitch to the left and the needle emerges on the left guide line.
Again, the working floss goes over/under the needle:
Pull and form the loop:
and then go back into the fabric on the middle guide line. Just keep doing these steps until your line of stitching is complete.
Here is a view of the finished stitching without the guide lines:
and here is what the underside of the stitching looks like:
I love this stitch now and I certainly want to express my thanks to Mary Corbet for the excellent stitch tutorial she provided on her video!
The Spanish Knotted Feather Stitch is #59 and is in the Knotted Stitches section of 100 Stitches. This was the eighth and final stitch in the knotted stitches section. I think the knotted stitches have become my favorite category of stitches so far :)
Wednesday, April 25, 2012
Friday, April 20, 2012
Spring greens and a vintage sewing book
I set out these beautiful spring greens while I was planning a stitching project. I love all the different shades:
I think I should be able to find a good color for lettuce leaves!
I also wanted to share some pictures from this wonderful vintage book. Apparently, this has been in my mom's family for several generations - the copyright is 1913 - it will be 100 years old next year! It is in great condition, except for some minor tears on the cover:
It has such sweet illustrations, look at this title page with all these little sewing helpers:
The book has quite a few sewing projects for doll's clothes. I love this little fur lined cape and rain coat:
It has tissue paper patterns for each article of clothing:
It is such a lovely book - I will be sure to share more pictures of some of the other projects as well.
I think I should be able to find a good color for lettuce leaves!
I also wanted to share some pictures from this wonderful vintage book. Apparently, this has been in my mom's family for several generations - the copyright is 1913 - it will be 100 years old next year! It is in great condition, except for some minor tears on the cover:
It has such sweet illustrations, look at this title page with all these little sewing helpers:
The book has quite a few sewing projects for doll's clothes. I love this little fur lined cape and rain coat:
It has tissue paper patterns for each article of clothing:
It is such a lovely book - I will be sure to share more pictures of some of the other projects as well.
Thursday, April 12, 2012
100 Stitches - Cretan Stitch
100 Stitches time again :) Next up is the Cretan Stitch:
This beauty looks like a great one to use for leaves:
As soon as I saw it, I knew I wanted to use it for one of the leaves from the Roses embroidery pattern. I think it will be perfect!
I used my water soluble pen and traced a single medium sized leaf. For the floss for my demonstration, I chose this beautiful and very leaf-y colored pearl cotton floss. This is dmc #988.
The first step is to come up through the fabric at the center top of the shape:
The next step is to make a small stitch on the right side of the shape.
*** I am pretty sure that I have figured out how to do this stitch correctly, however I think I need a bit more experimentation and practice before I feel confident that I am doing it correctly. The reason I say this is because I am still not sure how straight or slanted my needle should be in these next steps ***
The needle goes in at the edge of the shape and emerges inside the shape. Here you can see my needle is fairly horizontal.
As the needle comes all the way through, it is going to pass over the working thread. Pull all the way to the left:
Now the needle is going to go into the fabric on the left edge of the shape and emerge inside the shape and again, the needle is going to pass over the working thread:
And pull all the way to the right:
Next, the needle goes back in on the right side of the shape, emerges inside the shape and passes over the working thread:
Back and forth until the shape is filled.
*** Notice how my neede is a little more slanted here? As the shape widens and narrows, it is hard to make the individual stitches close enough together without changing the slant of your needle, this is where I need to do a little more experimenting and practicing***
When you are done, you will have a filled shape:
Here it is all cleaned up with the blue marker lines rinsed out. I like the interesting texture this stitch gives:
I think the stitches on the left side of my shape are a little more evenly spaced:
This stitch is even more interesting from the underside. It makes an outline!
I love the idea of using this stitch for leaves. Especially rose leaves:
This is stitch #35 and is listed in the Looped Stitches section of 100 Stitches.
This beauty looks like a great one to use for leaves:
As soon as I saw it, I knew I wanted to use it for one of the leaves from the Roses embroidery pattern. I think it will be perfect!
I used my water soluble pen and traced a single medium sized leaf. For the floss for my demonstration, I chose this beautiful and very leaf-y colored pearl cotton floss. This is dmc #988.
The first step is to come up through the fabric at the center top of the shape:
The next step is to make a small stitch on the right side of the shape.
*** I am pretty sure that I have figured out how to do this stitch correctly, however I think I need a bit more experimentation and practice before I feel confident that I am doing it correctly. The reason I say this is because I am still not sure how straight or slanted my needle should be in these next steps ***
The needle goes in at the edge of the shape and emerges inside the shape. Here you can see my needle is fairly horizontal.
As the needle comes all the way through, it is going to pass over the working thread. Pull all the way to the left:
Now the needle is going to go into the fabric on the left edge of the shape and emerge inside the shape and again, the needle is going to pass over the working thread:
And pull all the way to the right:
Next, the needle goes back in on the right side of the shape, emerges inside the shape and passes over the working thread:
Back and forth until the shape is filled.
*** Notice how my neede is a little more slanted here? As the shape widens and narrows, it is hard to make the individual stitches close enough together without changing the slant of your needle, this is where I need to do a little more experimenting and practicing***
When you are done, you will have a filled shape:
Here it is all cleaned up with the blue marker lines rinsed out. I like the interesting texture this stitch gives:
I think the stitches on the left side of my shape are a little more evenly spaced:
This stitch is even more interesting from the underside. It makes an outline!
I love the idea of using this stitch for leaves. Especially rose leaves:
This is stitch #35 and is listed in the Looped Stitches section of 100 Stitches.
Posted by
Kim
at
4/12/2012
Labels:
cretan stitch,
looped stitches,
Roses embroidery pattern packet
6
comments
Friday, April 6, 2012
Patisserie wip update
You might remember the little incident that occured when I was taking out some stitches on this project. I'm happy to say this has all been fixed!
I really want to thank everyone for their helpful comments on that post, I really appreciate it and I received so many good ideas and solutions. The solution I used was to carefully stitch over the hole with long stitches, first horizontally:
and then vertically. For the vertical stitches, I wove the thread over and under the horizontal thread. This was quite a challenge! In fact, I had to use a delicate sewing needle with a tiny eye rather than my usual embroidery needle. When I first started the repairing stitches, I used white sewing thread. The whites didn't quite match so it was very obvious and the sewing thread weight-wise was actually too coarse and heavy. I wasn't sure what sort of thread to use that would match both in color and weight. After a bit of experimenting, I ended up using a thread from my embroidery fabric! I carefully pulled the thread out of the weave along the cut edge of my fabric. It worked really well and you can barely see the repair.
The next step was to re-stitch the double knot stitch across the top of the curtain:
Now the repair just fades into the background :)
another view:
I finished the patisserie sign, if you remember on my last wip post, I had stitched the "e" in pink. I didn't like the way it looked so I decided to carefully take the pink stitches out and stitch all the letters in black.
I have completed all the stitching around the building. To make the foundation line of the shop stand out, I used two lines of stitching. One in a light gray and one in a darker gray. I also stitched all the delicious sweets in the patisserie.
I used the double knot stitch on the second tier of this three-tiered cake and I am really pleased with the frosting look that a border of french knots gives:
I love the way this turned out!
I really want to thank everyone for their helpful comments on that post, I really appreciate it and I received so many good ideas and solutions. The solution I used was to carefully stitch over the hole with long stitches, first horizontally:
and then vertically. For the vertical stitches, I wove the thread over and under the horizontal thread. This was quite a challenge! In fact, I had to use a delicate sewing needle with a tiny eye rather than my usual embroidery needle. When I first started the repairing stitches, I used white sewing thread. The whites didn't quite match so it was very obvious and the sewing thread weight-wise was actually too coarse and heavy. I wasn't sure what sort of thread to use that would match both in color and weight. After a bit of experimenting, I ended up using a thread from my embroidery fabric! I carefully pulled the thread out of the weave along the cut edge of my fabric. It worked really well and you can barely see the repair.
The next step was to re-stitch the double knot stitch across the top of the curtain:
Now the repair just fades into the background :)
another view:
I finished the patisserie sign, if you remember on my last wip post, I had stitched the "e" in pink. I didn't like the way it looked so I decided to carefully take the pink stitches out and stitch all the letters in black.
I have completed all the stitching around the building. To make the foundation line of the shop stand out, I used two lines of stitching. One in a light gray and one in a darker gray. I also stitched all the delicious sweets in the patisserie.
I used the double knot stitch on the second tier of this three-tiered cake and I am really pleased with the frosting look that a border of french knots gives:
I love the way this turned out!
Subscribe to:
Posts (Atom)


