

The next stitch on my list to learn is the Brick Stitch. This is a filling stitch, made up of vertical Straight Stitches. While very simple to do, it is not so simple to keep the stitches evenly spaced. I found that drawing guidelines was very helpful.

I drew horizontal lines about 1/4" apart:

This stitch is worked both from left to right and right to left. The first step is to come up through the fabric at the left edge of the third horizontal guide line and go back onto the fabric on the first horizontal line, forming the first Straight Stitch. I just repeated these all along the lines:

Next, to start back working from right to left, I came up through the fabric on the right edge of the second horizontal line and went back into the fabric on the fourth line:
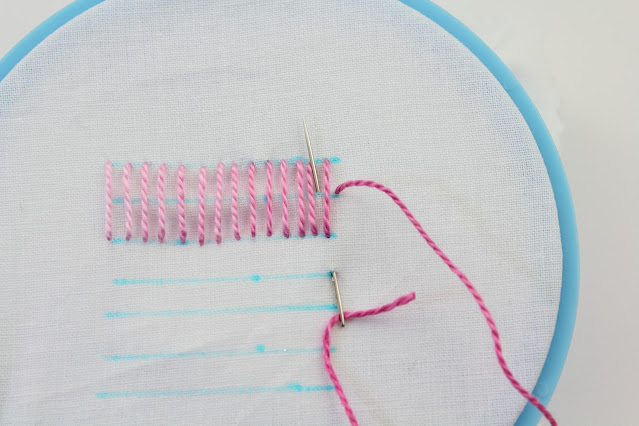

I worked my way to the left edge. To start again working left to right, I came up through the fabric right below the third horizontal line and went back into the fabric on the fifth line:

I just repeated this spacing for the next right to left and final left to right.


I think this is a beautiful filling stitch. The floss I used is a color variations perle cotton from DMC. The color number is 48.
I learned this stitch from the book Embroidery Stitches by Mary Webb.


I'm not sure if I have ever seen this stitch done before. Thanks for the tutorial.
ReplyDeletexx, Carol
Dear Kim,
ReplyDeleteAs always you make it look so simple. I was having a slight confusion about this stitch. This tutorial clarified it. I had seen this stitch in a few embroidery books. But confusion existed. The work is neat and I love the close up shots of the threads.
Mallika
Hi Carol, You are welcome! I followed the steps from Mary Webb's book Embroidery Stitches and my result looks like hers. When I was researching this stitch, I was surprised at how many "brick stitch" images there are on the internet that look like a different stitch. Even in the Webb book, there are two versions. One for even-weave fabric like I did and one for canvas stitching.
ReplyDeleteThank you Mallika! I am so happy to hear that this post was helpful. This was an easy stitch to do once there were lines to follow!
ReplyDelete