Time again for
100 Stitches! This gorgeous stitch is the step stitch:

It looks pretty difficult to do doesn't it?! It actually turned out to be easier that I thought it would be. At least my version :)

100 Stitches was a little short on some details. I had to just assume what was meant and go with that!

The first step is to draw some guidelines. 100 Stitches suggested that you make two parallel lines, approximately 1/2" apart:

Now, stitch the two lines with
chain stitch. Make sure the stitches are exactly in line with each other.

For the next steps, I chose a contrasting colored floss so that everything would be easy to see.

Come up through the fabric through the second chain stitch on the left side:

And back into the fabric through the second chain stitch on the right side. Work
straight stitches across the two rows of chain stitch...

linking every second pair...

of chain stitches:

Making a nice ladder look:

I am only stitching a few lines for my demonstration:

Three should be enough:

Now come up through the fabric right below the left side of your first straight stitch:

Make sure your floss stays on the left hand side of the needle and that your needle is pointing down. Go under the straight stitch and:

whip around the straight stitch about four or five times, until you are at the center of the straight stitch. At this point, insert your needle 1/8" above the straight stitch and bring it back up right below the straight stitch forming a vertical stitch:

Now making sure the needle is pointing up, and that your floss stays to the left side of the needle:

start whipping around the straight stitch:

about four or five times until you are at the right end of the straight stitch. 100 Stitches didn't specify how to finish this off so I just made an extra whip around and went back into the fabric and secured my floss:

Move down to the next straight stitch and start again:

When you reach the center, pass the needle under the middle vertical stitch you made on the straight stitch above you. Just pass your needle under it and pull down:

Now start whipping around the straight stitch just like you did before - remembering that this is the second half of the straight stitch so your needle is pointing up:

Finish that and start on the next straight stitch:

Just keep going until you have completed all of your straight stitches:

I hope that I did this stitch correctly, I would appreciate any advice or critiques! I also included a picture of the back of my stitching:

This stitch is #65 and is in the composite stitches section of 100 Stitches.
 It looks pretty difficult to do doesn't it?! It actually turned out to be easier that I thought it would be. At least my version :)
 100 Stitches was a little short on some details. I had to just assume what was meant and go with that!
 The first step is to draw some guidelines. 100 Stitches suggested that you make two parallel lines, approximately 1/2" apart:
 Now, stitch the two lines with chain stitch. Make sure the stitches are exactly in line with each other.
 For the next steps, I chose a contrasting colored floss so that everything would be easy to see.
 Come up through the fabric through the second chain stitch on the left side:
 And back into the fabric through the second chain stitch on the right side. Work straight stitches across the two rows of chain stitch...
 linking every second pair...
 of chain stitches:
 Making a nice ladder look:
 I am only stitching a few lines for my demonstration:
 Three should be enough:
 Now come up through the fabric right below the left side of your first straight stitch:
 Make sure your floss stays on the left hand side of the needle and that your needle is pointing down. Go under the straight stitch and:
 whip around the straight stitch about four or five times, until you are at the center of the straight stitch. At this point, insert your needle 1/8" above the straight stitch and bring it back up right below the straight stitch forming a vertical stitch:
  Now making sure the needle is pointing up, and that your floss stays to the left side of the needle:
 start whipping around the straight stitch:
 about four or five times until you are at the right end of the straight stitch. 100 Stitches didn't specify how to finish this off so I just made an extra whip around and went back into the fabric and secured my floss:
 Move down to the next straight stitch and start again:
 When you reach the center, pass the needle under the middle vertical stitch you made on the straight stitch above you. Just pass your needle under it and pull down:
 Now start whipping around the straight stitch just like you did before - remembering that this is the second half of the straight stitch so your needle is pointing up:
 Finish that and start on the next straight stitch:
 Just keep going until you have completed all of your straight stitches:
 I hope that I did this stitch correctly, I would appreciate any advice or critiques! I also included a picture of the back of my stitching:
 This stitch is #65 and is in the composite stitches section of 100 Stitches.

 He is one of the patterns in my new embroidery pattern packet. Here is a full view:
 And notice the blue oval stitched around the seahorse? I used the
  I will keep posting pictures of the patterns from this packet as I stitch them up. I really enjoyed selecting colors for this project. I used my color wheel:
 and came up with a combination of complementary colors (orange and blue) and split-complimentary colors (violet and green) I added a little brown and dark orange too! Here is a picture of the pattern packet. It is a 12 page pattern extravaganza ;)
 I started this stitching not really knowing what I was going to do with the finished product - I knew I loved this pale blue fabric and wanted it for my background. I love red and light blue together and I think the brown and white just finish this off. I have a lot more of this light blue fabric and also quite a bit of this beautiful red fabric:
 I am thinking I could maybe make this into a quilt square? I don't really know anything about quilting - I have only ever made one and that was just sewing 4" x 4" squares together and then putting a backing on it. I have been calling this little image snow baby because he is so little compared to the rest of the snowmen I am planning on stitching:
 Maybe I could do some quilt squares featuring all of them?
 Here is another view. I think this stitch could make a gorgeous border and the border could be either horizontal or vertical.


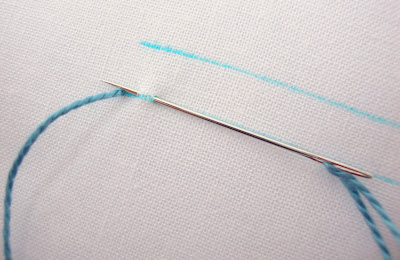


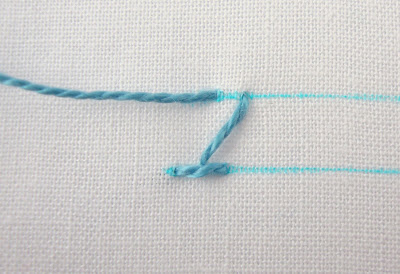


 and then go back into the fabric a little to the right of where your floss went into the fabric:
 pull all the way through and head back to the top guideline, a little to the right of your previous stitches:


 I also included a picture of the underside of my work!
 Nice and neat! ;) The blue floss I used is a pearl cotton - size five dmc #807. This stitch is #17 and is listed in the flat stitches section of 100 Stitches.


