Look closely at the outline of this heart. This isn't pom pom trim, this is the double knot stitch!

here is a nice close up view:

and an even closer view:

The double knot stitch is the latest stitch I have learned from
100 Stitches. I had to turn the instructions around to do this with my left hand, but with my demonstration you will be able to do this stitch left or right handed! This is a perfect stitch for an outline so to learn the stitch, you just need a drawn line to follow:

I worked this stitch from left to right. First, come up through your fabric on the left edge of your stitching line. A little to the right, take a small stitch that is perpendicular to your stitching line:

Pull the floss all the way through creating a stitch:

Now bring your needle up under the stitch you created. Don't pierce the fabric, just slip the needle under the stitch:

Pull the needle all the way through:

Next, bring your needle back below the stitching line and make sure the working floss is coming around to the right of your needle like this:

Now run your needle under the floss, again not piercing the fabric just going again under the stitch. Notice the needle tip - after it has passed under the stitch, make sure it goes over the working floss:

Pull all the way through and to the right to complete the double knot:

That is all there is to this stitch. To continue, you set up your next stitch to the right of your first knot:

Continue in the exact same way as the first stitch. I did the first couple of stitches really far apart so that my demonstration would be easy to see. However, I really like the look of the stitching line when the knots are closer together. I would space them more like this:

Just continue forming the stitches in a line at your preferred spacing until you have a beautiful line of stitching:

Perfect for outlining any shape!

This stitch leaves a very nice and neat underside as well:

The double knot stitch is #58 and is in the Knotted Stitches section of 100 Stitches.

 I can't wait to try this pattern! He is from a pattern packet that my grandma had. I don't know how old this pattern is, but it is on one huge sheet of paper and the individual pattern pieces have not been cut. I think I will scan this and work from a copy so that I can keep the pattern sheet as is:
  In the same envelope, there is a pattern for a large cat - those pieces have all been cut out. I would love to make the cat too!
  She also had these embroidery pattern transfers - there is an Aunt Martha "pillow slips" transfer, a Walker's Old Mexico and a Walker's Initials for Monograms.


 here is a nice close up view:
 and an even closer view:
 The double knot stitch is the latest stitch I have learned from


 Next, bring your needle back below the stitching line and make sure the working floss is coming around to the right of your needle like this:
 Now run your needle under the floss, again not piercing the fabric just going again under the stitch. Notice the needle tip - after it has passed under the stitch, make sure it goes over the working floss:
 Pull all the way through and to the right to complete the double knot:
 That is all there is to this stitch. To continue, you set up your next stitch to the right of your first knot:
 Continue in the exact same way as the first stitch. I did the first couple of stitches really far apart so that my demonstration would be easy to see. However, I really like the look of the stitching line when the knots are closer together. I would space them more like this:
 Just continue forming the stitches in a line at your preferred spacing until you have a beautiful line of stitching:
 Perfect for outlining any shape!
 This stitch leaves a very nice and neat underside as well:
 Not only is the pink color beautiful, but so is the texture. You can see the shine:
 This gorgeous pink floss is satin floss - DMC #S899. I am using this floss on this valentine key embroidery
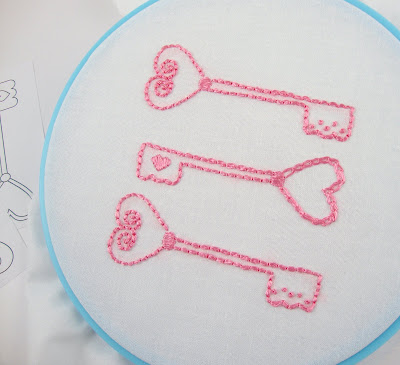 so much that I used it on all three keys!
 This floss is really silky and slippery and takes a little practice and patience to use. I think it is well worth the effort for the beautiful results.
 By using the checkered chain stitch - the latest stitch I have learned from
  Fun and very easy. I love the way that it works outlining this
  To stitch the checkered chain stitch, you will need two contrasting colored threads. For my demonstration, I used red and blue:
 You only need one needle, which you thread with both floss threads. Knot them together at the other end:
 Come up through your fabric:
 Now take a stitch, just like you are setting up a regular chain stitch:
 but now the special part of this stitch. Only one colored thread goes under the needle. The other color just lays on top:

 Now set up for the second stitch just like you would a regular chain stitch:
 Bring your needle through just like a regular chain stitch:
 But now...bring the other color under the needle and let the first color lay on the top. Here are two views:
 pull through to complete the second stitch:
 Now set up for the third stitch and this time the first color goes under the needle again and the second color lays on top:
 Pull all the way through:
 and you are on your way to doing the checkered chain stitch!
 Here is a picture of the underside of my fabric: this fun stitch looks nice on either side of the fabric!
 I have sketched this simple diagram to show the size and layout. This sketch shows the five eight by eight inch squares that will each have a different embroidered snowman:
 I have two of the snowmen stitched up and ready to go and I have started on a third. I have transferred the patterns of the remaining two onto fabric so they are ready to stitch. The rest of the squares will be four by four inch. I am also going to stitch some of the embellishment patterns onto some of these random squares. The four by four squares will all be in these fabrics - the red and white polka dot, powder blue and red:
 I hope this works out! I love the color scheme and I am excited to start the sewing squares together part of the quilt! When everyone is sewn together, I think I will add some decorative embroidery stitches too. I will keep the blog posted on my progress!


