I am posting a progress report on my Easter egg project. I have completed the ribbon and most of the decorative stitching on the egg.
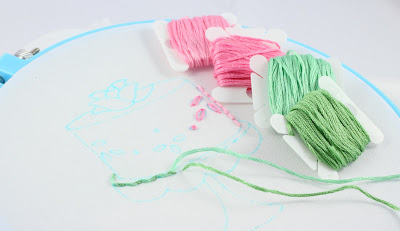
Now I am starting on the flowers at the bottom of the egg. First I am outlining the flower in the back stitch and then filling them in with the long and short stitch:
I am using two floss colors for each flower:
Now I need to fill in the flower centers and add all the decorative French knots!
Tuesday, February 26, 2013
Easter Egg Part Two
Posted by
Kim
at
2/26/2013
Labels:
back stitch,
Easter embroidery pattern packet,
french knot,
long and short stitch
10
comments

Tuesday, February 19, 2013
Easter Egg - Part One
I am starting an Easter egg stitching project. I am stitching this egg onto white fabric. The egg features a ribbon at the top, decorative lines and some flowers at the base. There are a lot of opportunities for color:
I am settling in on this color scheme - light and dark greens, pinks, blues and purples. I have a yellow for the flower centers and of course white for the egg :)
I used perle cotton for the egg outline. I am stitching the ribbon in the light purple cotton floss, this is such a pretty color!
To fill the ribbon, I am using lines of split stitch. I used the back stitch in green to add a decorative line to the egg. I like the look that two shades of green give this:
Here is a close up of the split stitching:
I will post some more pictures as I progress!
Tuesday, February 12, 2013
Heart Work-in-progress Finished
The heart work in progress is finished!
I love the way this turned out!
I did the text "Amor" in back stitch, except for the heart shaped "o". For that I used the Bokhara Couching Stitch. Remember that stitch? I demonstrated how I learned that here.
I think it is a wonderful stitch to fill in small shapes:
Here is the text after the blue water soluble pen marks have been washed out:
Once I finished the text, I used my pinking shears to cut all around my fabric piece. Then I took apart a picture frame
You may remember this frame from when I framed my picture from the Flowers Embroidery Pattern. I like to use this frame with no glass, it is perfect for displaying embroidery and I can change the picture all the time:
I tied a double bow from the ribbon and secured it with embroidery floss. Then I used double backed tape to secure the bow to the fabric:
Then I put it on a shelf in my office:
Amor! Just in time for Valentine's day!
Saturday, February 9, 2013
A new pattern!
I am so happy to announce that I have a new embroidery pattern packet in the shop! This one is called "Easter" and it is filled with wonderful, whimsical Easter motifs.
Here I am getting ready to cut out the individual motifs. This one has around 46 different images. I am going to be organizing them the same way I posted about here.
Now I am selecting some Easter color palettes. I like to collect bunny figurines and they always offer a nice color palette. I love this sweet inspiration:
as well as these happy colors:
This is what the pdf pattern packet looks like!
Thursday, February 7, 2013
Valentine's day heart progress
I have a progress report on this little project. Since that last post, I added some fiber-fill stuffing under the heart and then finished all the blanket stitching around the edge of the heart.
Here is a closer look at the blanket stitch. It did a really nice job keeping all the stuffing in and the heart secure to the backing fabric.
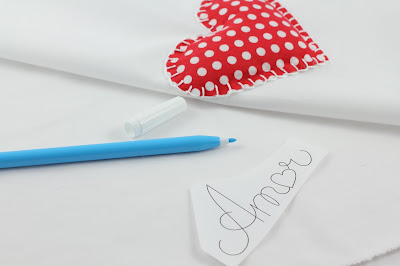
Now to add some text! I decided to use the Portuguese word for love - amor. It looks really beautiful written out - especially with a heart for the "o"
To transfer my pattern to my fabric, I used my water-soluble marking pen. This fabric is fairly easy to see through so I taped my word to a hard, smooth surface. In this case a clipboard:
Then I put the fabric over the top and traced the word:
Now I am ready to start stitching!
I have a few more steps after this stitching is done, I will keep you updated with my progress!
Posted by
Kim
at
2/07/2013
Labels:
Be Mine Valentine embroidery pattern packet,
water soluble marking pen,
wip
10
comments

Tuesday, February 5, 2013
Patisserie cake wip - finished
Remember my La Patisserie cake wip? I finished the next cake.
I am really pleased with the result:
For the cake plate, I used a combination of these two greens. I used the whipped running stitch to give the cake plate a decorative edge.
I used two different pinks on this project. A light pink for the cake and a darker pink for the cake decorations:
You can really see the color difference here:
I used three strands of floss for the cake body, and six strands for the top of the cake:
I stitched all the decorations using six strands of the dark pink, then I switched back to only three strands to do the very top of the rose.
You can see here the smaller line of stitching that using just three strands gives:
All the stitching is done and I washed out the blue transfer lines:
Now I am going to start on another one!
Here are the floss colors and numbers I used for this project:
Posted by
Kim
at
2/05/2013
Labels:
la patisserie embroidery pattern,
whipped running stitch
7
comments

Subscribe to:
Comments (Atom)


