Monday, February 29, 2016

Mid-Century Modern House Project Part Two


I have a finish and some new projects to share. Remember my Mid-Century Modern House?   I finished up with the stitching. 
I like the simplicity of this design so I kept the stitching really simple, only using three different stitches: Back Stitch, Straight Stitch and Split Stitch
I especially like the back stitch on the minimalist style lettering.

You may remember that on my previous post about this project, I was discussing my limited color palette:


 and whether I wanted to incorporate more colors.   


I decided to stick with my original color palette, in fact I didn't even end up using the black!  I think for this design, less color turned out to be the better choice:


Here is a list of the floss colors I used:


Now for some new stitching projects featuring motifs from the same Home Sweet Home pattern set:


Tuesday, February 16, 2016

Color and Color Palette Inspiration


I love working with colors.  I find color inspiration in so many places, such as the beautiful picture shown above.  This is a picture I cut from a desk calendar a few years ago.  I saved it because I loved the color palette.

I save anything I find to be a color inspiration and I like to keep it in a scrapbook or art journal.  
Here are a few of my art journals:


This journal I keep specifically for embroidery color palettes.  


It has blank pages of medium weight sketching paper.
I usually glue or attach whatever is my inspiration onto the page.
I often match embroidery floss to the inspiration color palette:


and record the floss numbers.


I was reminded to share this when I saw that the new Pantone 2016 Fall Fashion Report colors were released. 
I like to set up a journal page with their seasonal color palettes and match them to embroidery floss.
Here is my journal page with the colors and the DMC thread color numbers:


and here are the colors stitched on fabric.  It is a really beautiful palette!


Wednesday, February 10, 2016

Mid-Century Modern House Project Part One


I am starting a new stitching project that I would like to share.  This Mid-Century Modern house motif is from my Home Sweet Home pattern set.   


In planning my floss color palette,  I decided on browns, greens, turquoise and a touch of black.  

I did a little bit of stitching and the colors are looking really good together.


However, I think I need another bright color.  I don't think yellow will work because a yellow that is bright enough to stand out with the other colors might be too bright and would become a focal point.   Perhaps orange? 
I like all of these oranges and both of the butterscotch colors ... do you have a favorite?  Any other color suggestions?


I will keep you updated as I go along :)

Friday, February 5, 2016

Butterfly Chain Stitch


Isn't this a beautiful stitch?! This is the Butterfly Chain Stitch and it is the newest stitch I have learned from my 100 Stitches Plus list.

The Butterfly Chain Stitch is actually a composite stitch,  made up of two stitches - the Straight Stitch and the Twisted Chain Stitch.  The Straight Stitches are stitched in clusters of three stitches and then the Twisted Chain Stitch is worked over each cluster.

This stitch can be worked using two different colors or weights of floss or you could also use the same floss for both stitches.  

I like this pink and gray combination of perle cottons.
The pink is DMC color variations 4180 and the gray is DMC 414. 


Even though this looks fairly straightforward...I found it very helpful to measure and mark a few guidelines!


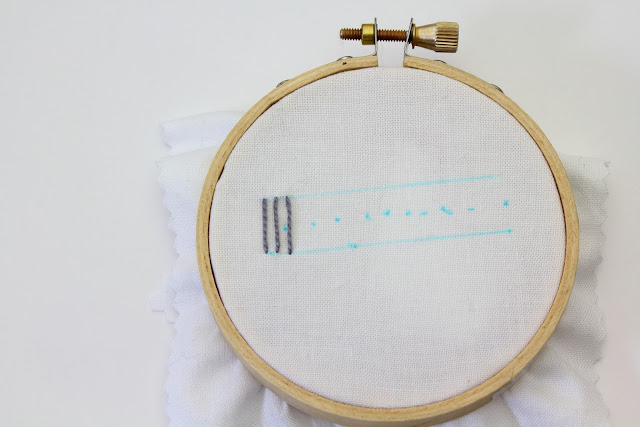
I marked two parallel guidelines at 1/2" apart.  These will define the width of the Straight Stitches.


I also marked a line equidistant between the two parallel lines.  This will be the guideline for the Twisted Chain Stitch:


First up are the Straight Stitches


To form these, I came out of the fabric on one parallel guideline and went back into the fabric at the opposite parallel guideline:


Three Straight Stitches - fairly close together make up the first cluster:


The clusters should be spaced so that the space between each cluster is the same as the width of each cluster.  So for mine, my cluster is 1/4" wide so I started the next cluster 1/4" to the right of the first cluster.


And the same for the next cluster:


All the way to the end of the parallel guidelines:


Next is the Twisted Chain Stitch in pink:


To start, I came up through the fabric on the center guideline at the edge of the last Straight Stitch cluster:


I pulled the thread all the way through:


Then I brought it back around and slid the needle under the first stitch cluster.  Notice in this picture the needle tip is going under the Straight Stitches and the working thread but is not entering the fabric.  It is just sliding across it:


Now the needle goes over the working thread - this creates a loop: 


and as the thread is pulled:


It draws the Straight Stitches together in the center. Make sure to pull this nice and tight so it forms a butterfly :) 


Now repeat for the second cluster:


Sliding under the cluster and working thread and then over the working thread:


Keep working down the line of clusters until the final one - I went back into the fabric on the center guideline right next to my final chain loop/knot:


Here is a look at the underside of this stitch:


And a final look with all the guidelines washed out:


This stitch is from the book Embroidery Stitches by Mary Webb.

Tuesday, February 2, 2016

On My Worktable Today


I have quite a few stitching projects on my worktable today.  They are either in progress or just being planned. 

I am giving my two favorite transfer pens a real workout.  They both seem to be running low on ink - I hope I can transfer all of these images! 


I also wanted to share a very quick stitching I did yesterday.  If you follow me on Instagram, you may have already seen the finish but here are a few process pictures.  

I used this lazy daisy egg from the Easter pattern set. For my colors, I chose a variety of light spring pastels.  Notice the big skein?  That is a variegated perle cotton


that I used to outline the egg.  I used the Stem Stitch. A nice stitch for this application as it shows off the color gradations of the floss and it makes such a neat line to form the curved edges the egg:


I stitched all of the Lazy Daisy stitches and French Knots to fill the inside of the Easter egg and here is the finish:


I had fun with this one, it took me less than an hour to finish,  most of that time was spent choosing colors!

As for the color palette, here are the floss numbers: