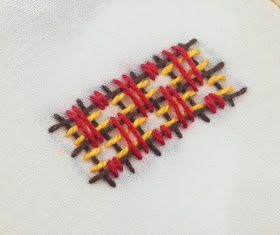
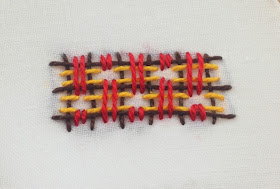
Isn't this the perfect Autumn colored plaid? This intricate looking stitch is the Plaid Filling Stitch. It is also known as the Tartan Stitch.
This is the latest stitch I have learned from my 100 Stitches Plus list.
Although this looks intricate, it is made up of simple Straight Stitches worked in a grid pattern with three layers.
To begin, I selected three different colors of perle cotton floss:
I used a ruler and a water soluble marking pen to draw a grid. Mine has three horizontal lines and six vertical lines.
I decided to use the brown floss for the first layer, which makes up the outline of the grid.
I started at the top of the first vertical line. I came up through the fabric:
pulled all the way through and went back into the fabric at the bottom of that first vertical line:
This formed the first Straight Stitch:
I worked Straight Stitches on the six vertical lines from left to right.
Next, I came up through the fabric on the bottom horizontal line:
I made a long Straight Stitch on each of the three horizontal lines:
That forms the grid. The next layers are worked over the grid and provide the plaid pattern effect.
For the second layer, I used the dark yellow floss.
This layer is worked only horizontally. I started on the left edge of the first vertical Straight Stitch. Notice, this stitch will be below the top horizontal Straight Stitch, it will be worked inside the grid:
I made a horizontal Straight Stitch across the first two vertical Straight Stitches:
Then the next two and the final two. Then I worked back from right to left:
making horizontal Straight Stitches across the same sets of vertical Straight Stitches:
For the next row, I started again on the left edge of the first vertical Straight Stitch, but this time below the second horizontal Straight Stitch. Also, to make a plaid pattern, this row needs to be offset from the rows above. To do that, this first horizontal Straight Stitch is worked over only one of the vertical Straight Stitches:
Then over the next two
and the next two and then over the single remaining vertical Straight Stitch.
I worked back from right to left to form the next row the same way, going over the same sets of vertical Straight Stitches:
That completes the second layer:
For the third layer, I am using the red floss.
The third layer is worked the same way as the second layer only vertically.
To continue the plaid effect, this layer also needs to be offset from the layer below. To achieve that - I first came up through the fabric between the first two vertical Straight Stitches and above the top horizontal Straight Stitch:
I made a horizontal Straight Stitch by going back into the fabric below the middle brown horizontal Straight Stitch:
Then made a second Straight Stitch over the single bottom brown horizontal Straight Stitch
I continued these offset Straight Stitches all across the grid:
This is a look at the underside of the stitch:
I learned this stitch from the book Embroidery Stitches by Mary Webb.


Hello Kim~
ReplyDeleteI am finally back online! This is a wonderful stitch to come back to. The colors are perfect for Autumn and look fabulous together.
This stitch is great in how complex it looks, but how easy it actually is. What do you think you would use it for? My first thought was that it would make a good stitch to use to cover up mending. Or maybe on apron pockets.
Thanks for such a complete tutorial on it. You do a great job on showing us how to do these from start to finish.
I am looking forward to seeing more of your work and I will have to see all that I missed.
Darlene
Hi Kim! This is simply perfect for Autumn! Thanks for sharing another great tutorial!
ReplyDeleteHave a fabulous weekend!
Hugs and love from Portugal,
Ana Love Craft
www.lovecraft2012.blogspot.com
Hi Darlene! Welcome back :) So happy you are back online! Yes this does look complex but it is easy and really enjoyable to do. I was thinking that this would be a pretty border stitch too. I made mine 3 x 6 but you could make it as long or as wide as you needed.
ReplyDeleteHi Ana, Thank you and hello to Portugal :) I hope you have a wonderful weekend too!!
ReplyDelete