I bought some "Aida" fabric. According to my research, it is a fabric that has a very open weave so that you can count the holes or squares between the warp (lenghtwise) thread and the weft (the thread that is woven under and over the warp thread). The Aida fabric that I bought is 22 count - that means there are 22 holes or squares per inch. I even marked off a 1" section and counted and there are 22 holes in it :)
Basically, the Holbein Stitch is just straight stitches that are all the same length and the same distance apart. The picture in 100 Stitches shows using the stitch to make a large "v" motif, so that is what I did. The stitch is completed by being stitched in two different directions. To show the two different directions, I am using two colors of pearl cotton floss. The pink is Variations DMC #4180 and the blue is DMC #798:
For the first part of the stitch, I am using the blue. This is going to be worked from right to left. The first step is to come up through the fabric. I am going to make the right "arm" of the v motif:
Next, count as many holes or squares as you want your stitch length to be. I came up through the fabric, counted four holes down (vertically) and went back into the fabric in the fifth hole:
Pull all the way through to form the first stitch:
Now count to the left of your stitch the same number of holes and come back up through the fabric:
Pull all the way through and count down (vertically) the same number of holes and go back into the fabric:
Pull all the way through and now come back up the same number to the left:
Pull all the way through, count down the same number and go back in:
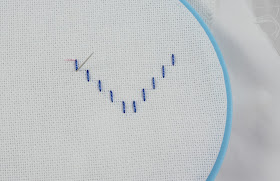
I am only doing five stitches here for the right arm of my v motif, but you could keep going if you wanted a bigger line of stitching:
Now I am going to start up the other side of the v motif, so count over the same number of holes and come up through the fabric:
Now count up (vertically) the same number and go back into the fabric:
Pull all the way through to make your stitch and now count over to the left the same number of holes:
Continue just like this until you have the same amount of stitches to form left arm of the v motif:
Now I started back in the other direction. I am using the pink floss. The first step is to count the same number over to the left and come up through the fabric:
Pull through and count the same number to the right. If all your counting is correct, you should go back into the fabric right where the blue floss ended:
Form the first pink stitch. Now it is really easy because you don't have to count, you are just filling in between all the blue stitches:
Working back down the left arm of the v motif:
And back up the right arm:
To finish, once you are at the top of the right arm of the v motif, count over the same number of holes and go back into the fabric:
Done!
This is a beautiful stitch. 100 Stitches mentions that this stitch may be used as an outline in cross stitch designs. I think it would make a nicel border stitch.
This is the view from the underside of the stitching. This stitch could look the same on both sides of the fabric (if I didn't knot my floss at the beginning or secure it at the end!)
The Holbein Stitch is #20 on the list of 100 Stitches. It is the last stitch I needed to learn to complete the flat stitches category!


.JPG)


So, where would you typically use a stitch like this? As an outline to showcase a motif? It's very pretty -- Oh! I just read that it would make a nice outline for a cross stitched design. Nice!! :)
ReplyDeleteVery nice! I am going to try doing my first embroidery soon. When I get better at it I might have to attempt some of your fancy stitches. Your tutorials always make things so easy to understand!
ReplyDeleteDenise - LOL! Yes I think I will probably want to use this as a border stitch.
ReplyDeleteThanks Johanna! I think you will have a lot of fun trying these stitches.
Oh I am looking forward to seeing the NON-flat category!!! Bring it on!
ReplyDeleteGreat blog, big B.
ReplyDeleteCheers from Argentina!
HD
I love the things you stitch, they're so pretty. Do you leave your work in the hoop for any amount of time or do you remove it when you're not working on it? xxx
ReplyDeleteMandy - lol! Some of the stitches in the other categories look SO difficult!
ReplyDeleteHi HD - Welcome and Thank you!
Emma - Thank you :) I try to always take my work back out of the hoop but more often than not, I set my work down and get busy doing something else and forget to remove it!
I love this stitch! Thanks for the step by step. :)
ReplyDelete