This interesting looking stitch is the spider web filling stitch.
This is the latest stitch on my 100 Stitches journey.
To demonstrate this stitch, I am using this beautiful pearl cotton floss - it is dmc color variations, #4025:
To set up this stitch, I really recommend using a circle as a guide. I also recommend making a dot in the middle of the circle:
The first step is to come up through the fabric on the upper left hand edge of the circle:
Then go back down into the fabric on the upper right hand edge of the circle:
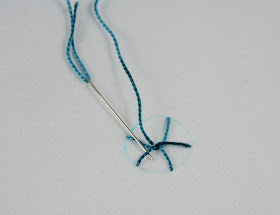
Take a downward pointing stitch and have the needle come out right on the center dot. Notice that the needle is going to go over the working floss - pull and this will form...
the start of a simple fly stitch:
Go back into the fabric at the center of the bottom edge of the circle:
and pull all the way through:
now come up on the bottom left hand edge of the circle:
and go back into the fabric right on the center dot:
and pull all the way through:
and then come back up on the bottom right hand edge of the circle:
and go back into the fabric on the center dot:
Now you have five "spokes". You are going to weave under and over these spokes with the working floss. To do that, come back up at the center dot:
and just start weaving - go over the first spoke, under the second spoke:
over-under, over-under, around the spokes:
keep going around and around, filling in the circle:
When you are done, just go back into the fabric and secure on the underside to finish the stitch:
Does my stitch look correct? I am just wondering because 100 Stitches didn't show a finished stitch picture.
I like the way this looks, especially with the color variations floss. I think it would make a good stitch for stitching Christmas candy if I get some of this floss in red and white!
Here is the underside of the stitch...you would never know what was going on up on top from this picture!
This stitch is #73 and is in the couching and filling stitches section of 100 Stitches.


It looks very nice. I will try to do it. The floss is fantastic.
ReplyDeleteBest regards,
Digna
http://elmondolivia.blogspot.com/
The way you show the stitches, it really looks manageable :) I just ordered a copy of 100 embroidery stitches. I really appreciate the work you are doing. Soon I will join the embroidery fun.
ReplyDeleteSusanne
Oh my gosh! That is perfect! Please tell me that you spend hours practicing, making a huge mess till you get it right;)
ReplyDeleteIts perfect Kim... your tutorials are always very easy to understand
ReplyDeleteI am sharing a treasure of Hand Embroidery, hope you like to come and see some traditional motifs and stitches
http://craftaworld.blogspot.com/
Love
Farah
wow, perfect addition to my stitches for crazy quilts. thank you much for the fabulous how to's. blest be :)
ReplyDeleteIt looks fantastic Kim! Can't wait to use it.
ReplyDeleteAngela
http://justgivemeaneedle.blogspot.com/
Thank you Digna - I love this floss!
ReplyDeleteHi Susanne - :) Thank you and I'm so glad you are getting the book!
Libby - LOL yes I really had to practice - this one wasn't as hard as some have been - remember my lazy daisy? But you should see some of the complicated stitches towards the end of the 100 Stitches book!!!
Farah - Thank you - these are fun to do!
Donna!ee - Thank you! This one would be beautiful on a crazy quilt.
Thanks Angela! I think you will like using this one.
Beautiful and easy! Thank you very much!
ReplyDelete