Wednesday, October 31, 2012

100 Stitches - Punch Stitch

No, this is not a little embroidered window, this is the Punch Stitch!  This is the latest stitch I have learned from my 100 Stitches book. 


I say learned but I am not really sure that I am doing the stitch correctly!


According to 100 Stitches, this stitch is used in a variety of ways.  It can be used as a filling stitch over an image of squares or dots in a grid.  It can also be used in Drawn Fabric Embroidery {I don't know anything about Drawn Fabric embroidery but I see that there are nine different stitches in the Drawn Fabric section of 100 Stitches so I will know about it soon enough!}


If this stitch is used as a filling stitch, a punch needle is supposed to be used to make holes to stitch multiple times through.   I don't have a punch needle so I used a wider woven fabric - 22 count Aida cloth - {I first learned about this cloth here} to try to compensate for the holes.  I drew the grid that is shown in 100 Stitches:


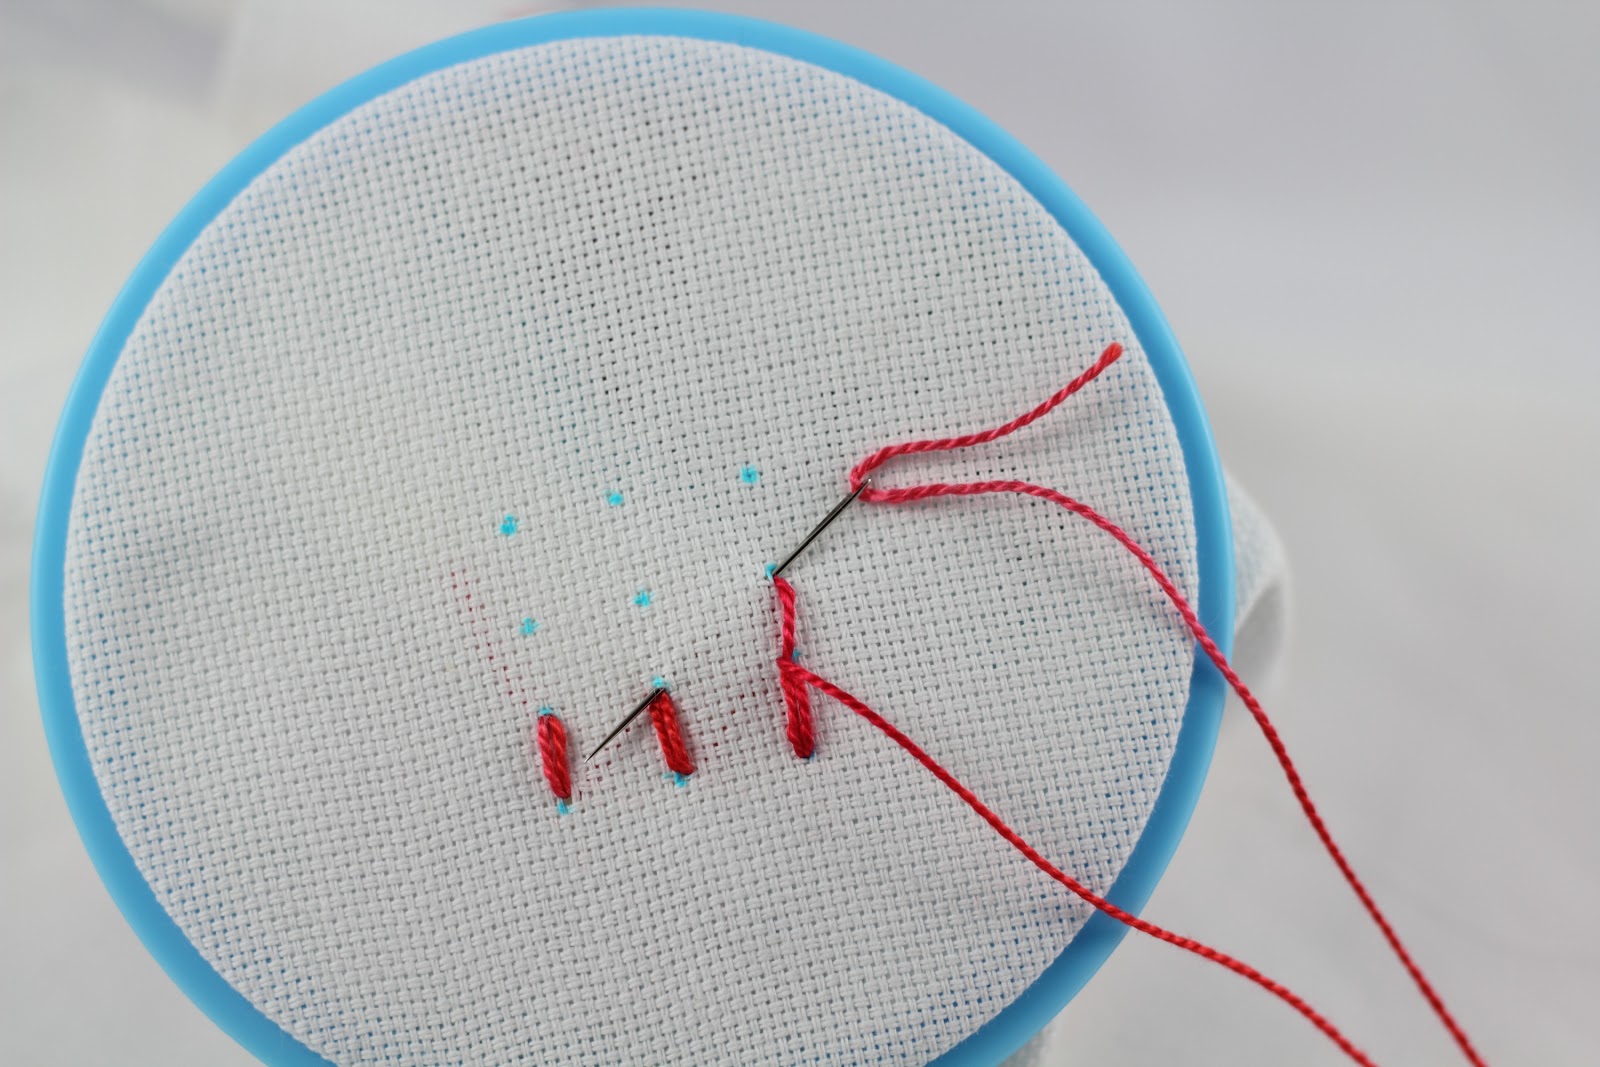
The stitch starts out being worked from right to left.  So I came up through the fabric on the right hole of the second row.


Then back into the fabric on the right hole of the top row:


Come back out of the fabric in the same hole where the thread first emerged - the middle row right:


Pull all the way through and this creates a straight stitch:


Now go back into the fabric in the top row right hole and come back out at a diagonal in the next hole to the left of the second row:


Pull all the way through and a second straight stitch is formed and you are ready to start the whole process again:


Just like before, go back into the fabric on the top hole and stitch to the left to finish the row.


This ends up with three sets of two straight stitches. 


There were no instructions about what to do with the thread at this point, just that you turn the hoop upside down and work the same way as before making the next vertical row:


Starting on the right again:


and working your way across the row:


Now turn the hoop right side up again and start across the third row:


When you complete that row it should look like this:


The next step is to turn the hoop sideways {!} and start at what is now the right side hole of the second row:


Just stitch across in the same fashion:


as before:


and when you complete that row, turn the hoop upside down and start stitching from right to left:


Just like before - stitch all the way across:


When you are done, you will have a completed punch stitch:


It is a beautiful stitch:


and is really interesting on the underside:


I think the reason I don't know if I am doing this stitch correctly is that there was no mention of what to do with the thread at the left end of each row...there isn't another hole to take a diagonal stitch to so I just took a second straight stitch.  I think that is the obvious way to finish, but if anyone knows anything about this stitch or if I am doing something wrong, I would love to hear from you!


The floss I used is floss - pearl cotton DMC color variations #4210 - radiant ruby.  This stitch is #74 and is in the Couching and Filling Stitches section of 100 Stitches.


Tuesday, October 23, 2012

Blending filament on an Autumn wip

I'm just starting to stitch this autumn leaf border. Notice the sparkly addition to my floss?


It is blending filament!  I have three of these now - gold, silver and multicolor {you may remember the multicolor from this post}


I am using the gold along with this variegated pearl cotton floss.  I have these two fabrics, both are cotton and each has a cream colored background with a pattern in white.  They are both beautiful!  The fabric pictured on top has a small leaf motif and the fabric on the bottom has a heart and flower motif:


I decided to use the fabric with the small leaf motif:


I am using a leaf border from the Autumn pattern.  Perfect for this fabric!


I cut the border out and transferred it to the fabric with my water soluble pen:


and started stitching.  You can see the size difference between the blending filament and the pearl cotton.  I just love the added sparkle! 


Monday, October 15, 2012

100 Stitches - Maltese Cross Stitch

I found this latest stitch on my 100 Stitches list to be so complicated that I actually had to draw a diagram to follow!


Here is the stitch completed - wow!  This is the Maltese Cross Stitch.  100 Stitches calls this a decorative motif.  Bascially, it is a foundation of crossed straight stitches with an interlacing thread on top:


I used two different colors for my stitch.  The purple is DMC #550 in pearl cotton and the yellow is DMC #727 also in pearl cotton:


I transferred my diagram onto my fabric.  Notice the end point of each line in this diagram.  These are all the spots where you come up or go into the fabric.  Notice also the outer most lines are split into two lines each but the four interior lines are solid across the whole motif.   My first step was to come up through the fabric at the very top of the motif.


Here is a partial list of the stitch order. 


You can follow the thread in these next pictures:


When I finished I had the foundation for this stitch.  The over/under positions of the threads making up this foundation are critical - if they are not correct, the top thread cannot be interlaced to make the design. 


Next I started the interlacing with the yellow thread.  I came up through the fabric at the top of the center square:


Then I started the interlacing:


The pictures included in the 100 Stitches book showed the interlacing progression and I literally had to trace my way through to follow all the over and under weaving!


Very confusing! 


This stitch is a lot like the Interlacing Stitch.


Here is a picture of the underside of the stitching:


Whew! I am glad I learned this stitch and so happy to have a picture to prove it!


It is a beautiful stitch:


The Maltese Cross Stitch is #62 on the list and is in the Composite Stitches section of 100 Stitches.