


 Dmc 4128 and 4130. They are the cotton pearl color variations which would give a really nice effect on autumn leaves. I wonder if mixing and matching both types would look good? Any suggestions are welcome! This pattern is sized to fit perfectly into a 6" hoop. I have transferred my pattern and have it all ready to go but I am stitching it in my 8" hoop. I personally find it easier to stitch in a medium to large size hoop. When I am finished, I am going to display this in my 6" hoop - I am so glad I have a 6" autumn-y looking wood hoop! For now I am off to experiment with color combinations.
 I didn't have too much left to do. I had already transferred my patterns onto the back panel:
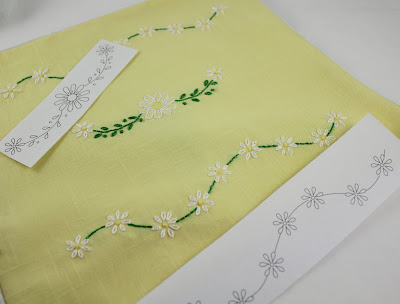

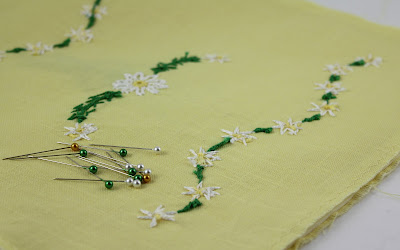
 and pinned everything in place - notice my matching pins!
 Next, I sewed them together, leaving a small space unsewn so that I could stuff the pillow:
  I decided to use a loose fiberfill to stuff the pillow - rather than a pillow form. My pillow measures 11-1/2" x 13" and I thought that I probably wouldn't find a pre-made pillow form with those dimensions! Plus, I wanted to customize the amount of puffiness for this pillow!
 I stuffed the fiberfill into the pillow:
 and then hand sewed the opening closed. Here is the finished pillow - front view:
 and back:
 I think the piping turned out to be the perfect trim!

 I found this to be a very easy stitch to learn. To demonstrate this stitch, I am using dmc color variations pearl cotton floss #4210. I drew two parallel lines with my water soluble marker:
 This stitch starts out sort of like the striped woven band stitch in that you make foundation bars, evenly spaced, perpendicular to your parallel lines. To do that, first come up through the fabric on the left parallel line:
 and then go back into the fabric directly across on right parallel line:
 this makes a small straight stitch or foundation bar:
 come back up again on the left parallel line to start the next foundation bar. Just continue like this until you have all the foundation bars you want.
 When you have all the foundation bars stitched, secure the floss on the underside. If you want to use a contrasting floss for the raised chain part of this stitch, you would now switch to that color. I opted to use the same floss. Bring the needle up through the fabric above the first foundation bar:
 Pull it all the way through. Now bring the needle under the first foundation bar, not grabbing any fabric, just sliding under the foundation bar. Notice the needle position...it is pointing upwards and heading to the left of where the working floss emerged from the fabric:
 pull the working floss all the way through:
 now notice the needle/floss position - bring the needle around to point down and slide under the first foundation bar and the floss is in a big loop:
 the needle is going to pass under the first foundation bar and head to the left:
 to pass over the working floss:
 keep pulling:
 all the way:
 to form the stitch:
 Now you just start over on the second foundation bar. Slide the needle pointing upwards under the second foundation bar and heading towards the left:
 pull all the way though:
 now bring the needle around and pointing down to slide under the second foundation bar and over the working floss:
 and pulling all the way to make the second stitch:
 100 Stitches didn't specify how to finish this stitch so I just went back into the fabric:
 below the last foundation bar:
 Here is the neat underside of the stitching:
 I think the raised chain band makes a beautiful line of stitching:
 This stitch is #64 on the 100 Stitches list. It is in the composite stitches section of 100 Stitches.


