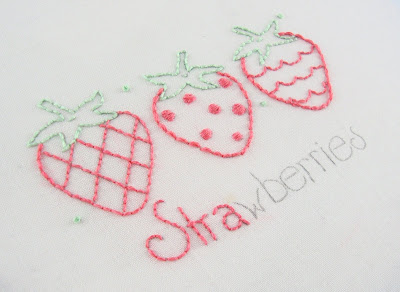
Doesn't this little red stitch make a nice strawberry seed?

This is the fly stitch! I had posted a picture of my strawberry tea towel both here on the blog and on my
Flickr stream. I described how I had "made up" a stitch to use for the strawberry seeds. Yesterday, I got a sweet note from
My1stBambina telling me that she thought the stitch looked like the fly stitch. I looked the stitch up in 100 Stitches and she was right! So I decided to make the fly stitch the latest stitch on the
100 Stitches list. Thank you My1stBambina! For the how-to pictures, I am using six strands of dmc #907 floss and a #24 chenille needle. I am stitching on 100% cotton quilting weight fabric.

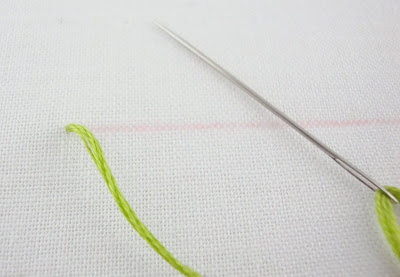
According to 100 Stitches, this stitch may be worked singly or in horizontal or vertical rows. I am just demonstrating single stitches. First, come up through your fabric for the top left of the stitch

Now take your needle back down through the fabric a little to the right of where your needle first emerged:

Pull the floss partially through

Now bring your needle up through the fabric below and in the center, making sure the floss is under the needle:

Pull all the way through light and loose,
not tight - this will form the stitch.

Now put your needle back down through the fabric directly under the stitch to anchor it in place.

Now you are free to move to another area and make another fly stitch!


 This is the fly stitch! I had posted a picture of my strawberry tea towel both here on the blog and on my Flickr stream. I described how I had "made up" a stitch to use for the strawberry seeds. Yesterday, I got a sweet note from My1stBambina telling me that she thought the stitch looked like the fly stitch. I looked the stitch up in 100 Stitches and she was right! So I decided to make the fly stitch the latest stitch on the 100 Stitches list. Thank you My1stBambina! For the how-to pictures, I am using six strands of dmc #907 floss and a #24 chenille needle. I am stitching on 100% cotton quilting weight fabric.
 According to 100 Stitches, this stitch may be worked singly or in horizontal or vertical rows. I am just demonstrating single stitches. First, come up through your fabric for the top left of the stitch
 Now take your needle back down through the fabric a little to the right of where your needle first emerged:
 Pull the floss partially through
 Now bring your needle up through the fabric below and in the center, making sure the floss is under the needle:
 Pull all the way through light and loose, not tight - this will form the stitch.
 Now put your needle back down through the fabric directly under the stitch to anchor it in place.
 Now you are free to move to another area and make another fly stitch!


 Next up on the
 Next, go back down through the fabric a stitch length to the right of where your floss just came out and come back up halfway between. Notice that the floss is below the needle:
 Now pull the needle through forming a simple stitch. Now repeat the process of going back down through the fabric a stitch length away from where your floss emerged. Bring the needle back up right at the end of the previous stitch and NOTICE the floss is now above the needle action.


 The white camellia has finally bloomed:
  These lilac bushes which are really old are in full bloom.

 and finally these little grape hyacinths. I love these because their blooms last for such a long time.


 Pull the floss all the way through to form a simple stitch. Now come back up through the fabric at what will be the bottom right of the NEXT "x":


 I'm not exactly sure how I am going to complete this - it could be a pillow, it could be framed as a picture, if I knew how to quilt I think it could make a sweet quilt block? It looks good with all different kinds and colors of trims...


